
It's Crafty Secrets challenge time, and this month we are showing off the new stuff!
I decided to show off the Mini Vintage Creative Scraps. I've been having so much fun these scraps, I did some ATC's and now soldered magnets.
I decided to show off the Mini Vintage Creative Scraps. I've been having so much fun these scraps, I did some ATC's and now soldered magnets.

 I made these magnets with images from the Mini Vintage Creative Scraps, it's so hard for me to pick out which ones I want to use, they're all so pretty!

Here are the supplies I used. I got this soldering kit from Ellen Hudson a few years ago, I checked and she still carries them.
I used a 12x12 ceramic tile that I got from Lowes to do the soldering on, it's a good work surface, it can take the heat of the soldering iron. I got the Memory Frames from Inspiratiaon Emporium, they have all sizes.
I used a 12x12 ceramic tile that I got from Lowes to do the soldering on, it's a good work surface, it can take the heat of the soldering iron. I got the Memory Frames from Inspiratiaon Emporium, they have all sizes.
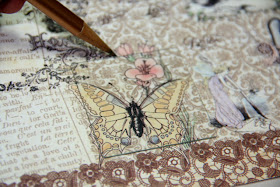
I traced around this glass piece on the butterfly from the back of the Creative Scraps and cut it out. I added the tiny words, Vintage Girl from the scraps.

I sandwiched the image between 2 pieces of glass and added the copper foil tape around the pieces. The foil tape is sticky, so it's easy to apply.

I used my bone folder to smooth the tape on the edges and corners, I fold the corners like I would when I'm wrapping a gift.
 Next, you paint on flux all around the foil tape, it's a liquid and it's very important in the process.
  Then apply your solder. I've found that the less solder I use the better, I used to pile it on and it took me forever to try and smooth it out. Now, I just melt small drops of solder on the edge, lay down my solder and smooth it with the iron. Keep in mind, I'm not an expert at this, I don't do it often, I wish I had more time for it. There are SO many things you can make from soldered pieces, magnets, jewerly, embellishments, etc.
 When it's cooled, you can smooth the rough edges with the nail file and polish it with a soft cloth. *see my finger nails, it's white crackle polish by OPI, not distress crackle paint Ü*
I glued magnets on the back with E6000.
~~~~~~~~~~~~~~~~~~
Now, check out the other designers projects and go to the Heartwarming Vintage Blog to check out Sandy's give-aways!
Vicki Chrisman Team Leader
Heidi Blankenship
Linda Duke
Michele Kovack
Julie Campbell
Amy Teets
Debbie Marcinkiewicz
Fauve van Maanen
Gini Cagle
Jan Hennings
Tammy Roberts
Victoria Warren Mears
Viola Mahr
Heartwarming Vintage blog
~~~~~~~~~~~~~~~~~~~~~~
Have a great day, thanks for stopping by!

Oh... very cool Pam! New to me! thanks for the tutorial!
ReplyDeleteLove these! The copper foil tape works so well for this and I'll have to give it a try :)
ReplyDeleteYow!!! I love what you did with the creative scraps Pam! thank you for sharing! (new to me too) :)
ReplyDeleteWOW... love these magnets! Great tutorial too!
ReplyDeleteThese are fabulous, Pam! I really need to learn a little soldering!
ReplyDeleteJulie
Pam - these magnets are fabulous! What a great little tool - looks like fun :)
ReplyDeleterebeccadunham at hotmail dot com
very beautiful and inspiring
ReplyDeleteI like how you soldered the pieces together and then made it into a magnectic. I used to do stain glass so I own all the stuff you done with this project. I will diffectly try this out. Thank you for sharing.
ReplyDeleteHave a great day :)
Delama
p.s. I aslo shared your project on my facebook.
These are so sweet, love all the images, what I really love is the vintage cookie tin you display them on, I love the pattern on the tin! Marilyn
ReplyDeleteThis is way cool and love all the patterns.
ReplyDeletethanks for sharing!
ReplyDeletelove this! thanks for the info.
ReplyDeleteThose are beautiful. I've never had the courage to try that.
ReplyDeleteawesome- one day I HAVE to do this- the new CS sets are gorgeous.. :)
ReplyDeleteWhat a fun tutorial and great magnets!
ReplyDeletehugs,
Gini
Very cool! Soldering isn't something I have tried yet..you do make it look not too hard!
ReplyDeleteOh WOW! Gorgeous!
ReplyDeleteGreat use of the scrap sheet images! I used to do soldering but haven't for a long time. Thanks for the links!
ReplyDeleteGreat tutorial Pam, and your projects are gorgeous, now I need to pull out all my soldering stuff and give it another try.
ReplyDeleteThis set is on my order list. Love your project. Thanks for the how to's..would be great little projects to keep on hand for last minute little treasures to share.
ReplyDeleteI have all the glass and supplies for the magnets as I use to do stain glass all the time. My supplies have sat on the shelf gathering dust for sometime. You have inspired me to create in it again.
ReplyDeleteBeautiful end results for this project. Thank you for the picture tutorial on how to make our own too.
ReplyDeleteThis looks like a lot of fun! Great idea!
ReplyDeleteYou make this look so easy and the results are beautiful.
ReplyDeleteThat is so creative,beautiful!
ReplyDeleteAbsolutely awesome! Love the pattern paper:)
ReplyDeletethese are so cool, one thing I would like to try sometime! Thanks for the tips!
ReplyDeleteWow! They are beautiful
ReplyDelete