Showing posts with label Crafty Secrets CD Designer Papers. Show all posts

Monday, November 25, 2013

young love

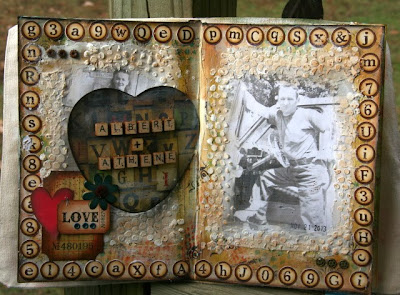
On these pages I wanted to do image transfers with the pic's of my mom and dad.
Well, that went south pretty quick. I think the problem was the setting I used to print the pic's. They turned out all different colors when I rubbed the paper away.
It was my first attempt at this, but I love the idea and I'll be trying again!
I printed the pic's again on copy paper and glued them down over my first attempt.
 I framed the pages with Crafty Secrets alpha stickers, I think they're retired but you could use any stickers. 
 Young love is in a song or song title, I don't know but, it popped in my head so I used it. My parents were pretty young in these pic's. Look at my dad's bold striped socks, so funny!
 I covered the inclusion with hearts I cut from the collage paper and trimmed around then.
Supplies: stamps - su! speckled stamp (retired). paper - tim holtz 8x8 collage paper stash, copy paper, donna downey art journal. ink - archival corn flower blue, red geranium, coffee. faber - castell dark sephia 175 pitt big brush pen. acces. - tim holtz bundled sage, peeled paint distress paint. crafty secrets alpha stickers (retired), embossing paste, multi matte medium, eyelets, jolee's boutique scrabble tile stickers, adage tickets, journaling tickets, prima wood flower embellishments and clock parts. tools - bubble and burlap stencils, crop-a-dile, tiny attacher, blending tool, heart cutter by creative memories, heat tool.
~~~~~~~~~~~~~~~~~~~~~
Remember to use my discount code at Inspiration Emporium for 10% off your order!

Have a great week and Happy Thanksgiving!
Be safe!
From Millan.Net


Wednesday, August 01, 2012

top dog mini

I RUFF Crafty Secrets, don't you? I just can't get enough of their stamp sets.
I just got the new Halloween sets, holy cuteness, Batman ;)
Today I'm showing you another couple of mini pages using the new Top Dog stamp set.  I'm an animal lover, I grew up with every domestic animal you can think of and not so domestic ones too, so these new sets are right up my ally! 
I decoupaged the background with papers I printed from the Creating with Vintage CD's. I tore some and cut some, just random paper scraps I had printed. I used some washi tape down the center to make it clean looking. I stamped the scallops on book paper with the Artsy Banners set using Archival Jet Black ink.
I used a chipboard fancy frame, they're sold out - but any frame would do - for the pup and the embossed alpha chipboard for the xo. I colored them with copic markers b21 and r27. I also used e31, e57, e37and rv11 on the pup. I put fired brick distress stickles on the xo and waterfall stickles on the frame.
The friends sentiment is mounted on a piece of cardstock cut with a Spellbinders scalloped rectangle die.
~~~~~~~~~~~~~~~~~~~~~~~~~~~
Check out the Crafty Secrets blog and see what Miss Sandy's up too! 
Have a great day!
Smiley from millan.net

Thursday, May 24, 2012

pre-school grad gift

Good Morning!
Today is graduation day for Jasmine, she's going to kindergarten next school year!
She's so excited to start school!
I made her a little gift filled with tags with pictures on them and we'll stuff some cash in there for her.
I used the new cd3 Creating with Vintage Typography from Crafty Secrets. See the little streamers hanging from the flower? I printed those from the CD and I printed all the tags too.
It so super simple to make a quick gift, like I did here.
I used some supplies that were already on my table, the Artsy Banners stamped book page, flower and lace. I love when it works out like that.
I can't remember where I got the bandaide tin, I've had it a long time.
Since I took these pictures, I've punched holes in each tag at the corner and put them through a binding ring. I thought she would keep up with the tags better that way.
I punched various pictures of her into 1 1/4" & 1 1/2" squares and adheared them to the tags, I distressed around each one with Distress Vintage Photo ink and a blending tool, then I added the ribbon and buttons, so easy!

See all the tags, they are gorgeous!
 ~~~~~~~~~~~~~~~~~~~~~~~~~
~~~~~~~~~~~~~~~~~~~~~~~~~~~
Have a fun safe weekend!
It's already a mad house around our tiny town!!
Smiley from millan.net

Tuesday, March 27, 2012

Art Journal & my anniversary give-away

Happy Tuesday!
I've got something to show you today that is totally different than my normal paper crafting.
I'm taking Tim's Creative Chemistry 101 online class and I have learned so much about the different Ranger inks and all the ways to use them.
I've also been watching Dyan Reaveley's videos from CHA on YouTube, I love her style of art! I was amazed by her art journals, just gorgeous! I was on a mission Saturday, going to flea markets looking for an old journal.and I found a small one with black suede covers, perfect! I spent most of the day Sunday trying my hand at a journal page, I have never been so inky in my life. One thing stuck in my head from Dyan, you never mess up, just go with it! This was really hard for me, usually everything has it's place and the ink has to be stamped perfectly, etc.
 
The background isdone with Ranger Distress Stains in Broken China, Spun Sugar, Sage Shadow, Peeled Paint & Fired Brick. I also used my Copic Opaque White and black & white Enamel Accents. Everything was stamped withArchival Jet Black ink. All of the stamps I used are by CraftySecrets, I used ABC Tophat for my letters, Flourishes, Mini Memories and Antique trims. SWEET Campells Soup painter girl is from a new set called All Dolled Up, Sandy said it will be available this Thursday in the store, I adore this set, it's a sweet paper doll set, ahhhh, the sweet memories of childhood! I thought she went perfect with the art journal theme!
In Tim's class he taught how to use the  Ranger inks in so many different ways. For my background, I misted the page with water and then I went to town adding my stains everywhere, I sprayed on more water, wiped off the excess and dried it with my heat tool. Then I misted some water in my hand and flicked it on the page for the water marks and dried that. All of the stamping was done after I did the background. The little girl is paper pieced with paper from my Crafty Secrets Creating with Patterns CD.
Sandy showed me a video yesterday by Diane from New Zeland. She uses Tim's ticket die and Distress inks to make the coolest embellishments, you gotta check it out.
So, what do you think? Remember, it's my very first journal page, please be gentle :)
I've really been in a stamping slump lately, I feel so into it now with a new way of creating for me. Tim's Creative Chemistry 101 class and Dyan Reaveley work have opened a new door for me, I'm pretty darned excited about it!
I'm waiting on a HUGE order from Inspiration Emporium, oodles of Dyan's goodies and the Distress Markers.
If you place an order from Inspiration Emporium don't forget to use my coupon code ieirisgarden at check out for 10% off your order.
~~~~~~~~~~~~~~~~~~~~~~~~~~~~~~~~~~~~~~~~~~
I was going to put up this post yesterday on my 5th blogoversary, but, I had an emergency.
Terry was on his way to physical therapy and got sick, he made it to the ER in Heber Springs, I met him there and it turns out he has a kidney stone. I'm not working today, he hasn't passed it yet and he's still in pain, he's staying drugged up, poor guy.

Anyway, I'm doing a give-away for my blogoversary!
I've got 2 bottles of Glimmer Mist, 2 Crafty Secrets Image and Journal Booklets, 2 Copic markers, 3 pages of lace stickers by Crafty Secrets and a Creating with Vintage Patterns CD by Crafty Secrets.
Just leave me a comment and your contact info and I'll pick a winner  Monday April 2.

~~~~~~~~~~~~~~~~~~~~~~~~~~~~~~~~~~~
I hope you have great day, see you Monday with my give-away winner.
Good Luck!
 Smiley from millan.net

Tuesday, January 31, 2012

Crafty Secrets Downloadable Valentine Kit & a give-away

Hello friends!
Have you seen the new downloadable Crafty Secrets  Valentine Kit Sandy is offering for only $5.00? It's really cute, the vintage images are adorable! There are some sweet Valentine cards, tags, paper, a box, cupcake wrapper and much more! All you need for a Valentine party, some cute cards, anything you want to create.
I printed off some papers and a tag sheet for my card.
I used my Alterations Mini Love Struck heart die to cut the hearts. I sewed them down the side and pinched the hearts together to give them some dimension. I added some heart stick pins and May Arts ribbon.

I cut out the sweet little clown image from one of the tags and one of the coupons  from the tag sheet. I distressed everything with my blending tool and Ranger Distress Vinatge Photo ink. The little heart bling on her hat is a Martha rhinestone and the red corner rhinestones are by Kaiser.
~~~~~~~~~~~~~~~~~~~~~~~~~~~~~~~~~
It's give-away time!
It's been awhile since I've done a give-away. Sandy sent us a couple of the new Creating with Vintage Illustrations CD's, so, it's up for grabs along with a sheet of Love Mail Creative Scraps, Altered Fairies Creative Scraps, Babyland Vintage Cuts, Baby Boy Vintage Postcard Kit and Childhood Images & Journal Notes. That's enough goodies to keep you busy for awhile!


Leave a comment on this post and I'll pick a winner next Tuesday, Feb. 7th. Please leave your contact email in your comment so I can reach you if you're the winner.
~~~~~~~~~~~~~~~~~~~~~~~~~~~~~~~~~~~
Terry had surgery on his hand today. His joint capsule was torn, the Dr. said the joint capsule holds the bones together from his wrist. He fixed that and put in a graft of some kind, not a skin graft, he said they may have to do that later after it heals. His main concern now was getting it healed. So, he'll be going back and forth to the Dr. for awhile, maybe another surgery and then there'll be physical therapy.
 He's very lucky.
~~~~~~~~~~~~~~~~~~~~~~~~~~~~~~~~
Smiley from millan.net

Friday, January 27, 2012

Vintage Cafe Card Challenge ~ chipboard heart

Hi friends, it's Vintage Cafe Card Challenge time and we are using chipboard hearts.
It's the perfect time to bring out my new Alterations Mini Lovestruck dies!
I sure do miss Tim Holtz's class, I know they are having a blast now at CHA (Craft and Hobby Association) in CA. I got to take his class when I went to stay with Joy a few years ago during CHA and I was amazed at his work and generosity! The whole gang is so nice!
OK, enough of the CHA envy :)
I painted the chipboard pieces with Distress Crackle Paints in Worn Lipstick and Fired Brick. After it dried I added Rock Candy Distress Stickles to the angels wings and heart for a little sparkle.
I cut the bottom edge of the blue cardstock with my MFT Jumbo Scalloped die. The Creative Scrap piece is cut with my Spellbinders Classic Scalloped Rectangle die. 
The LOVE ticket is from the Creative Scraps. I distressed everything with Ranger Distress Antique Linen and Vintage Photo ink and my blending tool. I rounded the bottom corners with my corner punch. I added the tiny pom-pom trim with my Tiny Attacher. The buttons are vintage from my stash.
Now, it's your turn. Go the Vintage Cafe Card Challenge blog, upload your creation for a chance to win some fun supplies!
~~~~~~~~~~~~~~~~~~~~~~~~~~~~~~~~~
I'm sad to say I'm stepping down from the VCCC design team. I've had a lot of fun on the team, Olga and Lana have been so nice, and it's been a fun experience working with a team filled with so many talented girls around the world.
I'm staying with my mom more, she has a lady that sleeps at her house 5 days a week, and nurses come to see her 3 or 4 times a week so, I'm trying to stay with her on the weekends as much as I can. I live an hour away from her and I work, I'm still figuring all of this out now. She'll be 87 Feb. 10th and she's needing more care now. My daughter is going to help out and stay with her too. I have so much going on now, it's hard for me to keep up. I've been in a terrible funk and haven't been in my craft room much at all. On top of everything else my back is acting up again, my Dr. talked about surgery, but, now is not the time for that. So, more pills to take, blech, LOL. My husband got hurt Tuesday at work, his hand got caught in a wire reel between the reel and the reel frame. We go see the Ortho hand specialist tomorrow, the ER Dr. said there will be skin grafting involved.
~~~~~~~~~~~~~~~~~~~~~~~~~~~~~
Thanks for hanging with me I really appreciate your comments, they brighten my day.
Smiley from millan.net


Monday, November 28, 2011

Crafty Secrets Creating with Vintage Illustrations CD 2

Good Monday Morning!
Today I want to show you another tag I made with the new Crafty Secrets Creating with Vintage Illustrations CD #2.
Have you checked it out yet? You can find all the info about the new CD on the Heart Warming Vintage Blog. You can check out the major changes going on at Crafty Secrets too, Sandy and Scott are scaling down, and that is something we all need to do to keep our sanity, LOL!
This is one of my fave papers from the CD #2. I used a journaling card from a Creative Scrap and added the paper covered chipborad heart to that.

I got the coffee stained flowers from a junk sale, it looks like they are made from tea stained coffee filters. The chipboard heart leaves are coved with tissue tape, I love this stuff, so easy to use. All of the distressing is done with Ranger Distress Gathered Twigs ink.

Check out the designers blogs, the list is on the left, they are wroking up a storm on new samples for this new CD, you'll be inspired!
Remember, Sandy is selling out all of her stamp sets, everything is on sale but the new CD's and Creative Scraps, I'm SO happy she's keeping the Creative Scraps!
~~~~~~~~~~~~~~~~~~~~~~~~~~~~~~~~~~~~~~~~~~~~~~~~~~~~~~
I hope you have a great Monday, thanks for stopping by, I really appreciate it my friends!
Smiley from millan.net

Tuesday, November 22, 2011

Crafty Secrets new CD Creating with Vintage Illustrations

Good Morning!
This week the Crafty Secrets DT ladies are showing you new designs from the second new CD, Creating with Vintage Illustrations!
There are so many fun designs, papers, templates, frames, layouts, wait until you see!
Sandy has some big news too, big changes are coming to Crafty Secrets, more about that later.
 This is a tag I made with the new CD.
I printed the paper for the tag base, the floral paper for the mini dress form and the sentiment.


 I had these DMC floss cards that I'd picked up at a flea market and I got this spool of string at a junk sale in Mtn.View for like a $1. I wrapped the string around the floss tag and distressed it with Ranger Gathered Twigs ink. I put the buttons on quilting pins with Glue Dots to stick through the floss tag. 
~~~~~~~~~~~~~~~~~~~~~~~~~
Here's a teacup I made from the template on the CD. I printed the paper design on cardstock, then I turned it over and ran it back through printing the template. I cut it out and folded it on the score lines, it's really easy. I added an Alterations Mini Rosette that I covered with Martha Stewart glitter. I sprayed the rosette with Elmers Craft Bond spray adhesive and glittered away! Wouldn't these be cute name tags for place settings?
~~~~~~~~~~~~~~~~~~~~~~
Crafty Secrets is going to change their Clear Stamps to Digital CD’s and all the stamps will go on sale starting this Friday!  Why? Owner Sandy Redburn says her husband retired last year and they want to simplify their life. “With over 200 stamp sets and over 100 printed products it’s time to clear the clutter and make room for some exciting new changes!  

As the Clear Art Stamps sell out, they will be grouped into themes and sold on CD’s which will include inspiring samples, new images and printable papers.
This will be the SALE pricing on the Clear Art Stamps starting this Friday while supplies last.
Large Clear Art Stamps originally $24.99 on sale for $19.99, Medium sets reg $14.99 on sale for $12.99 and Small Clear Art Stamp Sets reg $7.50 on sale for $5.99!

So head on over to the Heartwarming Vintage Blog and check out all of the details.
You can see many more samples from the new CD on the designers blogs too, they are listed here on the left of my blog page.
~~~~~~~~~~~~~~~~~~~~~~~~~~ 
I hope you all have a blessed Thanksgiving!
Smiley from millan.net


Friday, October 21, 2011

Vintage Cafe Card Challenge ~ kitchen

Happy Friday!
Today is another Vintage Cafe Card Challenge, this challenge is to make a card kitchen related.
I decided to use the Crafty Secrets Farm Fresh Creative Scraps for my card. Crafty Secrets has so many fun retro images, it's hard to choose!
I had fun picking out the red checked paper from the Crafty Secrets Creating with Vintage Patterns CD and May Arts ribbon! 

 See the flattened bottle cap? My friend Cindy makes these and I've always wanted to try one, you run the cap through your die cut machine and it kinda flattens it, no sharp edges! I punched the image with a Martha Stewart punch and glued it inside the cap.
I made the trinket pin by gluing a vintage button on a quilting pin. 
Now it's your turn! Make your kitchen themed card and upload it to the Vintage Cafe Card Challenge blog and see if you are the winner, you could win some great supplies!
~~~~~~~~~~~~~~~~~~~~~~~~
Stay tuned, Monday is the Crafty Secrets monthly challenge. It's something a little different this month, I think you'll like it!
Have a great weekend, thanks for stopping by!
Smiley from millan.net

Friday, October 07, 2011

Vintage Cafe Card Challenge 3 ~ flourishes

 Good Morning!
Today is the Vintage Cafe Card Challenge and this one is to use flourishes.
 Who doesn't love flourishes, they are so pretty and vintage, anyway you use them! 
I used 2 of the new Crafty Secrets stamp sets, Mini Frames and Grand Greetings. I mounted the image on a piece cut with my Spellbinders Big Scalloped Ovals SM. I mounted that on a paper doilie that I trimed a little so it would have a straight edge. The card base is Neenah Solar White cardstock and the pattern papers are from the Creating with Vinatge Patterns CD. The flourishes are from Maya Road, I painted them with my Ranger Snowcap paint dabber and sprinkled glitter on the wet paint. The white felt flower is cut with MFT rolled flower die and I put a Kaiser pearl in the center and some more at the top of the stamped frame. The white leaf is punched with a Martha Stewart punch. I trimmed off the right edge of the card front about 1/2" and adheared the vintage lace on the inside of the card front. I put a strip of the pattern paper on the back inside edge.
Go to the Vintage Card Cafe blog to check out the challenge and upload your card, you could be the winner of some nice prizes!
Good Luck!
~~~~~~~~~~~~~~~~~~~~~~~~
35 years ago today, I gave birth to my first child and 30 years ago tomorrow my second.
Happy Birthday, my loves.
Smiley from millan.net
 Have a great weekend!

Monday, September 19, 2011

Crafty Secrets September Challenge ~ Retro

Good Morning!
It's Crafty Secrets challenge time again and this month it's all things retro.
Remember those plastic tissue boxes that were the in thing in the 50's and 60's? You could get vanity sets, powder boxes, lotion dispensers and tissue boxes. I remember my mom had a pink set with rhinestones on it.
I see them in flea markets, I picked this one up for $1. It's pretty as is, but, you know I had to dress it up with paper!

I  printed off some patterned paper from the Creating with Vintage Patterns CD on copy paper and coverd the box, I adhered the paper with Mod Podge. I stamped the banner from the Artsy Banner stamp set with Ranger Distress Old Paper ink, cut it out and adhered it all around the top edge of the box. I painted on a coat of Mod Podge over the paper to protect it. I glued on some vintage white buttons on the banner flags on the front. I adhered some tiny pom-pom trim to the top edge all the way around.
I pulled out my Alterations rosette and mini rosette dies and cut some rosettes for the top. Are you getting tired of my rosettes yet? It seems like I use  them on everything I make, I LOVE those dies!! I cut the rosettes with paper from the Crafty Secrets Pastel Paper Pad and some My Minds Eye 12x12 paper strips. I cut the different sizes and layered them and glued buttons on top. I threaded the buttons with tiny strips of cardstock. I stuck 2 green stick pins in one of the rosettes.
~~~~~~~~~~~~~~~~~~~~~~~~~~~~~~~~~~~~~~~~~~~~~~~~~
That's my project, now check out the other girls projects and the Heartwarming Vintage Blog to see some eye candy!
~~~~~~~~~~~~~~~~~~~~~~~~~~~~~~~~~~~~~~~
Thanks so much for stopping by, have a great week!
Smiley from millan.net

Monday, August 29, 2011

a bee bottle and a party

Good Morning!
I have an altered bottle and a birthday party to show you today.

So, do you like my new blog design? I love it. I felt like I needed a blog over haul so I contacted Karen at Karen Valentine Design and told her what I was looking for and she came through like a dream! She used one of my pages from my fleur de lis album as her starting point and added the soft colors that I love and irises, of course :) I'm so glad I found Karen, no way I could have managed this on my own!  
~~~~~~~~~~~~~~~~~~~~~~~~~~~~
Now, for my bottle. The plastic bottle is a Watkin's dish detergent bottle. Watkins products have been around forever and their packaging is the old timey vintage that I love. I wanted to try my hand at an old vintage label, so, I used my Crafty Secrets Queen Bee stamp set along with the French Mail set and made a new label for a honey bottle.

I did my stamping with Ranger Distress Black Soot and Vintage Photo inks and my distressing with Antique Linen and a blending tool. I used Copic markers for my coloring in G82, W1, E23, YR21, B95. I colored my seam binding with Distress Stains in Antique Linen, Broken China and Wild Honey. I added Rock Candy Distress Stickles to the bees wings.

~~~~~~~~~~~~~~~~~~~~~~~~~~
These are pictures of my granddaughter Sonny's birthday party, she's a whole 1 year old now! She had to be stripped for the cake eating, LOL!

She wasn't happy here because someone got into her cake!

Here's big brother sneaking a cupcake.

Here they are at the pool. This is Jr. and his buddy, all the little ones at the party belong to Dustin's friends he grew up with, Kyle, Tyrel and John.
Here's Sonny after her cake bath opening her gifts.

Taking a break for sun screen.

Here's Sonny and Kyle's oldest in the sand box turned kittie pool.
Sonny and Dustin getting ready for cake.
~~~~~~~~~~~~~~~~~~~~~~~~~~~~~~~~~~
Have a great week, thanks for stopping by!
Smiley from millan.net
Related Posts Plugin for WordPress, Blogger...