Showing posts with label Challenges. Show all posts

Monday, August 25, 2014

everything goes!

Hello friends!
The Inspiration Journal challenge this month is 'everything goes' you're free to do whatever you like!

I recently got the Retro Halloween Framelits set and the block die. Yeah, I'm way late to the game with these, but, there is SO much I NEED and it takes time to acquire everything! 
I had fun with this after I got in the swing of making it, I quite like the skeleton witch holding the skull garland, looks like she's holding skull paper dolls! haha


 I've had the rosette on my desk in the catchall dish forever, I finally had the chance to use it!
I love using Enamel Accents for dimensional eyeballs! 
You just squeeze a drop of white onto the eye and then squeeze a drop of black on top of the white, it just forms perfectly. I usually let it dry overnight before I handle it
~~~~~~~~~~~~~~~~
Supplies: stamps - retro halloween framelits. paper - black and white cardstock, lost and found paper stack. ink - archival jet black, terra cotta and pitch black alcohol inks, blending solution. distress ink in vintage photo. acces. - black and white enamel accents, wooden skewer, foil tape sheets, elements tissue tape, martha stewart carnelian glitter, cereal box cardboard. tools - retro halloween framelits, vintage lace, bats and crossbones garland, mini rosette and block dies, hot glue gun, foam squares
~~~~~~~~~~~~~~~~
It's your turn to upload your project over at the Inspiration Journal for your chance to win $50 in store goods from Inspiration Emporium. When you're shopping make sure and use my discount code ieirisgarden for 10% off your purchase!

It just so happens Linda Ledbetter at Studio L3 the social media coordinator for Inspiration Emporium is hosting the CC3Challenge #9, (Compendium of Curiosities 3) and the challenge is to use any Tim Holtz Framelits set. There are prizes galore to be had, so make sure and enter your Framelits project over there for your chance to win!
~~~~~~~~~~~~~~~
Have a great day!
From Millan.Net


Wednesday, May 28, 2014

celebrate father's day

Hello!
I made a card to go with the paperweight I made last week.
It's for the celebrate challenge going on at the Inspiration Journal.
The papers I used are from the Kraft Resist paper stash, 8x8 collage paper stash and a piece of scrap black cardstock. I cut the clock, card,  frame, frame background and diamond strips from the 8x8 collage paper. The clock hand is a game spinner.  
I stamped the frame in VersaMark ink, sprinkled on some pumice stone Distress embossing powder and heat set it with my heat tool. I die cut the frame with the Sizzix Framed Sihoulettes frame die and distressed the edges with Distress vintage photo ink. The guys head was cut with the die from that set.
The diamond strips were cut with the Sizzix Borders dies and I put 3 mini fasteners in the bottom strip for a little interest.

Here's the link to the paperweight.
~~~~~~~~~~~~~~~~~~~~~~~~~~~~
That's it, now head on over to the Inspiration Journal and upload your celebration creation for a chance to win some Inspiration Emporium $$$, you have until the end of the month so hurry!
Don't forget to use my coupon code ieirisgarden at checkout for your discount!
~~~~~~~~~~~~~~~~~~~~~~~~~~~~
Have a great day!
From Millan.Net


Monday, January 13, 2014

who are you

 Hello, hello!
I have another die/punch project for you today.
I've been picking up old photos here and there from flea markets knowing I wanted to do some art with them. I've always thought how sad it is to find these vintage photos in flea markets and not in their families possession. I always wonder, who are you? 
The song "Who Are You" by The Who always comes to mind when I'm thinking about doing this journal page, so, I found the picture to use for the sentiment. The babies dress is huge, a great space for my song title sentiment! I cut out the letters from the Tim Holtz 8x8 collage paper stash.  
 The background is paper from the Tim Holtz kraft resist paper stash and vintage pattern tissue. I cut and tore them in pieces and adhered them to the pages with mod podge. I punched the book page circles with a 11/2" circle punch. I drew around the circles and and pictures with a Faber-Castell PITT big brush pen sephia 175.
 Next came the dies. Tattered Florals for the burlap and felt flowers, mini butterflies for the cardboard butterflies, picture wheel, Spellbinders classic ovals for the oval behind the the flowers on the collage inclusion.
 I used some vintage photo corners that were gifted to me a while back from my friend Lisa Zappa.
(I sure miss you girly)
I used Kaiser pearls, film strip ribbon and crinkle ribbon that I colored with Antique Linen reinker, a giggle Adage Ticket.
I smeared gesso on the butterflies with my finger.

~~~~~~~~~~~~~~~~~~~
I've been looking at the pictures from CHA 2014 and I was blown away when I saw that Tim Holtz has released Found Relatives, vintage photo cards, what timing, huh?! Who knew?!
If you don't have vintage photos on hand or don't do the flea market thing you can now have them in your stash!
Make sure you check out Inspiration Emporium for the latest CHA pre-ordering going up.
Remember to enter discount code ieirisgarden at check out for a 10% discount!
~~~~~~~~~~~~~~~~~~
Have a great day!
From Millan.Net

Monday, January 06, 2014

home is where the heart is

Happy New Year, right?!
My first blog post for the new year, and I can tell you we are colder here than Anchorage, AK. right now, 11 degrees or something crazy like that! Taking these pic's out on the deck this morning was an experience I tell ya, boo-zeeee. We are SO not used to this around here!
Now, I can say I'm warm and cozy, writing this post, really dreading going to work in the morning!
~~~~~~~~~~~~~~~~~~~~~~~~~~~~~ 
Inspiration Emporium's challenge this month is to use diecuts or punches in your project.
This is perfect for me because I normally use diecuts in my projects.
The dies and punch I used are Tim Holtz Artful Dwellings for the houses and Mini Tattered Florals. I used a 3/4" square punch for the windows in the houses.
I used papers from the Tim Holtz 8x8 Seasonal Paper Stash for the houses and hand cut hearts and Terminology Tissue Wrap to cover the inclusion and for my flowers.
To start I painted gesso on the pages for a clean surface to start on. I painted on Distress Paint in Bundled Sage, a little Gathered Twigs and more gesso and wiped it off with baby wipes. Leaving enough paint to get the color I wanted.
  I colored the ABC Tissue Tape with Distress Bundled Sage ink and a blender tool.
The flower stems are made with Distress Markers.
The texture in the background is the plaid stamp from Wendy Vecchi's Be Inspired stamp set. 
I made the Bundled Sage polkadots on the background with the Distress Paint, I just stamped it on the page and I also swiped it on the tag after I had put Gathered Twigs Distress ink on over the Burlap Stencil.
My granddaughter Jayde was here and she stamped the sentiment for me, good job Jayde!
I traced all of the cutouts and diecuts with Faber-Castell PITT Big Brush Markers for shadowing.


I diecut the flowers and stapled them all together with the Tiny Attacher.
I wanted to lightly color them with Distress, I didn't want a vibrant color, so I made some little spray paint bottles with Distress Paint. I filled a Mini Mister about 1/3 full with the paint and filled  it up with water and shock it up, tah-dah!
 Now, it's your turn to create your diecut or punched project and upload it to the Inspiration Journal for your chance to win $50 to spend in the Inspiration Emporium store! (be watching, the post for the challenge should be up soon!)
Remember, you can always use my discount code ieirisgarden for 10% off your order!
~~~~~~~~~~~~~~~~~~~~~~~~~
Have a great day, stay warm!
From Millan.Net

Saturday, September 28, 2013

sentimental journey

Good Morning bloggers!
This is my last creation for September.
Can you believe October is around the corner? Summer went by way too fast, I'm not ready for winter.
Anyway, I've got a tag to show you today using the new Tim Holtz Framed Silhouettes stamp and die set. 
 I covered a #8 manila tag with paper from the Prima Divine 6x6 paper pad. I stamped the frame with VersaMark ink and heat embossed it with gold embossing powder. Then I stamped the lady head with Archival jet black ink and die cut the frame and head with the dies in the set. I put her head on a piece of the Prima paper, adheared it to the frame and filled the center with Crackle Accents for a cracked glass look.
 Next came the bouquet of flowers. I colored the stamp with Distress Markers in worn lipstick, peeled paint and weathered wood. I used the old huffing trick to moisten the ink and stamped it. Then I cut that out with the die from the set and added the Kaiser pearls and rhinestones. I inked the stamp again and stamped it on the bottom left.
Next, I stamped the crinkle ribbon with Archival cornflower blue ink and cut it out with the die in the set. I went over it with some cornflower blue ink and my blending tool. The butterfly was laying on my desk so I added it to the tag. It's made using chipboard, the mini butterflies die set, picket fence crackle paint and glitter.
The sentiment is from Tim's chitchat verbages. I distressed the stickers with Distress Walnut Stain ink and a blending tool. I went around the edges with my tracing wheel. The crinkle ribbon is colored with bundled sage Distress Stain.
~~~~~~~~~~~~~~~~~~~~~~
That's it for September! Hope you like the tag!
Remember to upload your creation for the September challenge over at The Journal, it's not too late!
You can always use my discount code ieirisgarden at checkout for 10% off your purchase at Inspiration Emporium!
~~~~~~~~~~~~~~~~~~~
Have a great weekend!
From Millan.Net

Tuesday, September 17, 2013

night moves

 Hey bloggers!
Here I am with another spooky journal page.
When I started I wanted to do a night scene with a picket fence in the foreground. 
The skull is the eerie moon!
I've had this fence idea rolling around in my head for awhile as soon as I got the stamp. 

 I started by painting the page with gesso, drying that and spraying with water before I started spraying the Dylusions ink. I used black marble for the sky adding more water and dabbing with a paper towel until I got the look I wanted. 
For the ground I sprayed water and then the melted chocolate and cut grass, again, I used the paper towel moving it around until I liked the look. Next, I added Archival cornflower blue and watering can with my blending tool to give it a little color. I did the same at the bottom with coffee and olive ink.
I used the Prima 6x6 cracked stencil and Dylusions black marble ink here and there for some texture.
I stamped the fence along the bottom, the trees, birds and cat from Dylusions bits and bats stamp set with Archival jet black ink. I colored the fence with gesso, it blended with the ink on the page and toned it down so the white wasn't so bright, perfect! I stamped the skull from Tim's Apothecary set on book paper and colored the teeth with my Gelly Roll white pen. I used the 31 from the numbers Remnant Rubs on his forehead. I cut him out and adheared him to the page with matte multi medium and went around the edges with it so my black Faber-Castell big brush pen would stay wet enough for me to smear the ink with my finger. I colored the trees, birds, spider and cat with the pen so they would stand out more.
I put the words from the Apothecary remnant rubs in the fence posts, the fence says it all with the perfect Halloween words!
I finished it off with tissue tape all around the edges.
I hope you enjoy the page.
~~~~~~~~~~~~~~
Have you uploaded your entry in The Journals monthly challenge?
You really should, you could win $50 in Inspiration Emporium goodness!
Remember, you can always use my discount code ieirisgarden for 10% off your order!
~~~~~~~~~~~~~~~~~~
Have a great day!
From Millan.Net

Thursday, September 05, 2013

spooky

Hey bloggers!
I have a challenge piece to show you today.
The Journal September challenge at Inspiration Emporium this month is 'faux'.
I headed over to Splitcoast Stampers to check out their tutorials and Beate Johns had a great faux leather tutorial. It's super easy, not many supplies needed at all and I love the look! I did a little faux stitching too.

I made another Halloween tag, I'll put both tags in my journal next, so stay tuned for that.
 I put little pieces of masking tape on a #8 tag and trimmed the edges.
 I put Distress Walnut Stain ink on lightly and on top of that I added Vintage Photo ink for more color.
 Next I poured on clear embossing powder, no need to put VersaMark ink on first, the EP sticks to the tape.
 I heat set the tag with my heat tool...
 and that was it! So easy. Next came decorating the tag.
 
I cut out the letters for 'spooky' and the pumpkin picture from Tim's seasonal 8x8 paper stash.
I used the Alterations Vintage Lace and Umbrella Man dies to cut the black cardstock.
I colored the Crinkle Ribbon with Distress Scattered Straw and Brushed Corduroy reinkers.
For the faux stitching I went around the edges of the picture with my tracing wheel and then I connected the dots with my Sakura Micron 03 black ink pen.
I adhered everything with multi medium in matte and put a coat over everything so I could do some distressing with the Archival Jet Black ink pad and my black Faber-Castell big brush pen.
I added a couple of  fasteners at the top along with a philosopy tag, trinket pin and sprocket tied with the ribbon.
~~~~~~~~~~~~~~~~~~~~
That's it, now it's your turn to do your faux project and upload to The Journal for a chance to win $50 in Inspiration Emporium goodies!
Remember you can always use my discount code ieirisgarden for 10% off your order!
~~~~~~~~~~~~~~
Have a great weekend!
From Millan.Net


Wednesday, August 07, 2013

Inspiration Emporium travel

Today I have a journal page to show
you with a travel theme, that's the challenge at Inspiration Emporiums Journal this month.

The first thing I grabbed was the Tim Holtz Remnants Rubs Words and Elements. They've got the perfect words and travel related pictures.
I used papers from Tim Holtz's 8x8 collage paper stash, cut them in different sizes and glued them on randomly. Then I did the inking and stamping. I used Dylusions melted chocolate spray ink and Prima's Flourish stencil randomly on the page. I used the script stamp from the Prima Hello Pastel set and the lace, background and tack stamps from the Sunrise Sunset set, I used Archival jet black and vermillion ink.
The rectangle piece of paper behind the girl looked like an old vintage suitcase, that's what inspired the suitcase. I got into my chipboard and found a huge o, cut it in half, inked it up with Distress Walnut Stain ink, added the giant brads and glued it down. I punched some corners for the bottom with a corner punch. 
While I was in my chipboard stash I found some Tim Holtz grungeboard dots elements and plain seasonal pieces, the lantern and arrow. I painted the lantern with my pitch black paint dabber and added Glossy Accents inside for the glass. I put Distress Faded Jeans ink on the arrow with a blender tool and added Faded Jeans Distress Stickles.
I stamped the Prima doll stamp on cream cardstock and paper pieced her dress and headband with paper from the collage paper pad. I colored her with Copic markers e00, r20 and e57.
I cut a piece of a vintage cloth tape measure and put it on the edge of the page with the tiny attacher. 
I had a couple of pieces of vintage lace on my desk and I used those along the top and side of the page.
I outlined the suitcase and doll with my black Faber-Castell big brush marker and smeared the ink with my finger for definition.
Ok, head on over to the Journal and upload your travel creation, you could be a winner of the wonderous $50 in store goods!
~~~~~~~~~~~~~~~~~~~~~~~~~~~~
Have a great day!
  From Millan.Net 

Thursday, July 11, 2013

Inspiration Journal guest

Hi bloggers, it's my turn to guest post this week for the Inspiration Journal.
This months challenge theme is birthdays or celebrating.
I decided to make a pocket card for money or gift cards.
 To make the card I cut a piece of white cardstock at 4 1/4" vertically, scored at 5 1/2" and scored again at 1 1/2" from one end, folded and creased. I cut another piece of white and embossed it with my notebook texture fade and adhered it under the flap on the card front.
Next, I cut a piece of grey and white polka-dot paper from the prima hello pastel 6x6 paper pad and adhered it to the inside back of the card. I cut pieces of different papers from the pad and made flags and adhered them to the flap.
For the insert, I made a tag and attached a strip of paper with my tiny attacher to hold the money. I punched the corners of the insert and card with a SU! corner punch.
I traced along the top of the flap with my tracing wheel for the faux stitching.
I made the flower with my alterations mini paper rosettes die with a piece of paper from the idea-ology vintage shabby paper stack. I added the prima metal bird paper clip and the happy birthday sentiment from idea-ology label letters.
~~~~~~~~~~~~~~~~~~~~~~
                  Make sure you upload your celebration work of art for your chance to win $50 to spend at Inspiration Emporium!
Thanks for stopping by!
  From Millan.Net

Wednesday, July 03, 2013

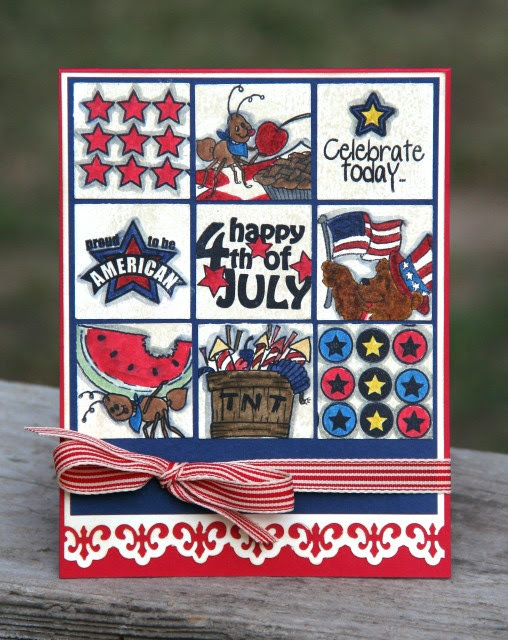
happy 4th!

Happy 4th bloggers!
The challenge over at the Inspiration Journal this month is celebrating America or any birthday.
I had some great 4th stamp sets by Our Craft Lounge, I used various stamps from 3 sets, Patriotic Parade, Life's a Picnic and All about the USA. These and all of the OCL sets are on sale at Inspiration Emporium!
I stamped them with Archival Jet Black ink on vanilla cardstock. I colored them in with Distress and Copic markers. I stamped over each image with a block stamp by Stampers Anonymous and Distress Antique Linen ink. Then I used my 1 1/4" square punch and punched part or all of the stamped image and adhered it to the navy blue cardstock. The punched border along the bottom is punched with a fleur de lis EK Success punch. The ribbon is May Arts.

That's it, now create your master piece and upload it to the Inspiration Journal, you could be the winner!
~~~~~~~~~~~~~~~~
I hope y'all have a fun, safe 4th!
~~~~~~~~~~~~~~~~~~~~~~~
 From Millan.Net

Wednesday, June 19, 2013

there is love

This months challenge at Inspiration Emporium is weddings, anniversaries, anything that inspires you for this month of  wedded bliss!
I did a canvas in white with handmade lace flowers and die cutting goodness.
The pics are my mom and dad, they are my fave pics of them, so I use them in a lot of projects.
They were married in 1946.

Remember "The Wedding Song" by Paul Stookey of Peter, Paul and Mary?
I know some of you do, for those of you who don't or you just want to hear the song I've included a link to the video.
I've always thought it was the perfect song for the big day.
So beautiful and gentle, it tells the story of love.

All of the chipboard pieces are painted with Distress Picket Fence crackle paint and sprinkled with glitter. The dies I used are Tim Holtz mini love struck, mini butterflies and regal crest by Sizzix. I cut the pic's with my Spellbinder's classic ovals large.
The background paper is a piece from the Tim Holtz 8x8 collage paper stash. I painted a light coat of gesso over it to tone it down and wiped off some with a wet wipe.
I applied a large piece of lace diagnally across the canvas with multi medium. I painted it on and layed the lace down over it and went around the sides. The "there is love" is from chitchat verbages.
I added some small Kaiser pearls here and there.

~~~~~~~~~~~~~~~~~~~
Here is what I used to make the flowers.
Cardstock scraps, 1 1/4 and 1 3/8" circle punches, Fabric-Tac, vintage lace, beads, hot glue gun
I punched the circles from the cardstock and glued the end of the lace to the center of the circle with my glue gun. I started twisting the lace and winding it around the circle putting spots of Fabric-Tac down to hold the lace in place. After I was happy with the flower, I cut the lace and glued the end to the back. I squeezed some glue in the center of each flower and sprinkled on the beads.
That's it, hope you're inspired to play along this month.
~~~~~~~~~~~~~~~~~~~~~~~~~~
Hope you have a beautiful day!
 From Millan.Net
Related Posts Plugin for WordPress, Blogger...