Wednesday, August 01, 2012

top dog mini

I RUFF Crafty Secrets, don't you? I just can't get enough of their stamp sets.
I just got the new Halloween sets, holy cuteness, Batman ;)
Today I'm showing you another couple of mini pages using the new Top Dog stamp set.  I'm an animal lover, I grew up with every domestic animal you can think of and not so domestic ones too, so these new sets are right up my ally! 
I decoupaged the background with papers I printed from the Creating with Vintage CD's. I tore some and cut some, just random paper scraps I had printed. I used some washi tape down the center to make it clean looking. I stamped the scallops on book paper with the Artsy Banners set using Archival Jet Black ink.
I used a chipboard fancy frame, they're sold out - but any frame would do - for the pup and the embossed alpha chipboard for the xo. I colored them with copic markers b21 and r27. I also used e31, e57, e37and rv11 on the pup. I put fired brick distress stickles on the xo and waterfall stickles on the frame.
The friends sentiment is mounted on a piece of cardstock cut with a Spellbinders scalloped rectangle die.
~~~~~~~~~~~~~~~~~~~~~~~~~~~
Check out the Crafty Secrets blog and see what Miss Sandy's up too! 
Have a great day!
Smiley from millan.net

Wednesday, July 25, 2012

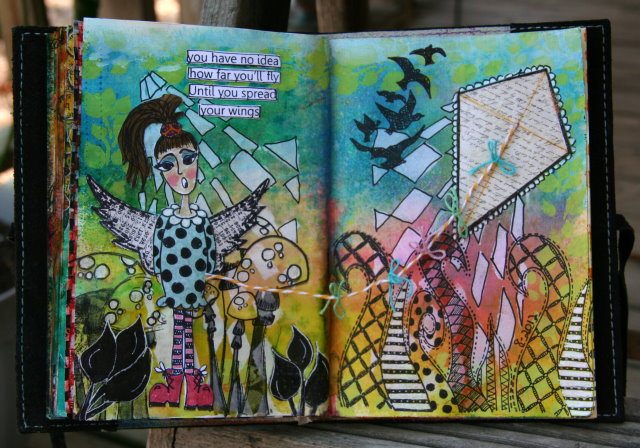
fly a kite

I'm at it again, I can't get enough, this journaling stuff makes me happy!
The August challenge at Inspiration Emporium is  fly a kite, how fun, huh?
I dug into my Dylusions stamps, inks, and stencils and went to town.
I always do my Dylusion journal pages the same, spray with water spray a few inks, dab it off with a paper towel and start my stenciling with paint or ink and stamping.
I made my own kite for this one, just drew it out on patterned paper, cut it out and added some rock candy stickles for some sparkle. I tied a tail with my string and tied little bows along the tail with more string.
I doodled around the kite to give it a little dimension.
The Dylusion stamp sets I used are doodle parts, love struck lucy, bits and bats and quintessential quotes.         
I did my stamping with Archival Jet Black ink, I paper pieced her dress and highlighted the black dots with my Spica black glitter pen. 
I did my coloring with Distress Markers, and my outlining with my Gelly Roll white pen and Trend Micro black 08 pen.
I had the most wonderful mail day yesterday, 4 new Dylusional stamp sets, Dyan's Christmas collection! Have you read her Christmas words set? It cracks me up, I love that woman, LOL! All of her new sets are in at IE, use my coupon code ieirisgarden for your discount!
Make sure you add your kite project to the IE Blog in August for a chance to win $50 in IE goodies!
~~~~~~~~~~~~~~~~~~~~~~~~~~~~~~~~
Man, we are burning up here. It's unusual if we have a high temp below 100, and no rain to speak of, maybe a  2 minute squirt every now and then. I know of farmers that are selling their cattle because the pastures are all dead and the price of hay is outrageous.
It's a sad situation. I've got the prettiest gardenia bush in my yard I've had for years, it's totally dead now :(
I hope y'all aren't as crunchy as we are here. 
Smiley from millan.net

Monday, July 16, 2012

Cutie Cats

I have a new journal.
I got this one at Hobby Lobby, it 's 3 3/4 x 5 1/4.
Crafty Secrets stamps are mostly small like most stamps and it's harder to fill a larger journal page, the way I like to journal , anyway.
So I thought this would be perfect for Crafty Secrets journal pages.
I used the new medium stamp set Cutie Cats for my first pages in this journal. I love cats, so, this was a no brainer :)
I used Dylusions spray inks in postbox red and pure sunshine for the background, I sprayed the pages with water first. I used Dylusions 5x8 dotted flowers stencil and dabbed the dots with white acrylic paint and a paint dabber. I watered down some of the white paint and flecked some on the background by tapping the paint brush with a pencil. I stamped around the edges with a line design stamp and paw prints stamps from the set. I used Archival Jet Black ink to do the stamping. I stamped both cats colored them with the ink sprays and a fine tip water brush. I found some of my old labels that I got in a box of stuff at an auction and used this postage one.
I put some old photo corners on each corner. I love the sentiments in this set, I used 3 of them here.
I put orange peel stickles here and there on the pages. I used my Sakura micron 08 pen to do outlining.
I put the journal on this clipboard to hold it open so I could get a good picture.
~~~~~~~~~~~~~~~~~~~~~~~~~~~~~~~~~~~~~~
Go check out the Crafty Secrets blog to see what Sandy has going on, there's always something fun!
~~~~~~~~~~~~~~~~~~~~~~~~~~~~~~
Have a great day!
Smiley from millan.net

Monday, July 02, 2012

red, white and blue ~ inspiration emporium

Good morning, friends!
It's that time of the month, when Inspiration Emporium has their monthly challenge!
Hmmmm, wonder what this month is.....yep, red, white and blue!
I did another journal project. This time I used gesso, for the first time!
I had some black showing through from the previous page and I needed to cover it up. So, I painted gesso on with a brush to start. Then I rubbed the pages down with my red pepper paint dabber. I made some dots on the background with my Dylusions dotted flowers 5x8 stencil with the gesso and a sponge dabber. I had some punched scalloped circles on my desk that I glued on and I die cut 3 stars and the flag with my mini old glory die out of Grunge paper.
I colored them and added Distress Stickles in Rock Candy, Fired Brick and a Stickles blue. The white stars are made with the "stencil" for the die, I dabbed them with gesso. I added some vintage lace die cut strips I had on my desk too, that's something I love about this journaling I do, just add anything and it works!
I used several of Dyan's Dylusional stamp sets, Further Round the Edge, Basic Backgrounds, Love Struck Lucy and Doodle Parts. I did my coloring with Copic markers b24, r27, 100, e00 and e57. I used my white Gellyroll pen and my Trend Micro black pens for the doodling and tracing. I did my stamping with Archival Jet Black, Vermillia and French Ultrmarine. I added the idea-ology numeral 4. 
That's it, now make your own red, white and blue project and upload to the Inspiration Emporium blog, you could when $50 in IE goodies, it's that easy! Don't forget to use my coupon code ieirisgarden at check out for your discount!
~~~~~~~~~~~~~~~~~~~~~~~~~~~~~~~~~~~~~
I hope you have a safe 4th, we are under a burn ban, so no fire works around here. All the shows etc. have been postponed till it rains. I'm looking at, oh, September, maybe ;)
Smiley from millan.net

Friday, June 29, 2012

fairies and pixies

Good Morning!
I have 2 atcs to show you made with the new Crafty Secrets Fairy Wishes and Pixie Dust stamp sets.
Oh my.....how cute are these sets?! Adorable!!

The one on the left is made with the Fairy Wishes set. I stamped the fairy, bird, xox and the scroll along the bottom with Archival Jet Black ink. The background papers are printed from the new Crafty Secrets  Creating with Vintage Typography CD. I colored the images with Copic markers e00, rv11, r83, bg72, g21, y17, y0000 and b21. I added glitter to her wings and Amuse twinkle stickers to her antennas and by the bird. I used my tracing wheel for the faux stitching around the edges. I used my blending tool and Distress Vintage Photo ink to distress the edges. I attached some May Arts zigzag velvet ribbon with my tiny attacher.
~~~~~~~~~~~~~~~~~~~~~~~~~~~~~~~~~~~~
For the rectangle one I used the Pixie Dust set. I used mostly the same supplies. The Copic markers I used are g82, yg23, bg72, rv11, e57, w3 and e00. I used some mini pompom trim. I stamped one of the flowers again and popped it up with a piece of a foam dot for a little dimension. 

Head on over to the Crafty Secrets blog and see what's going on, there is always something fun!
Have a great weekend, thanks for stopping by!
Smiley from millan.net

Tuesday, June 19, 2012

Inspiration Emporium ~ car cup holder coasters

Hi friends!
I have a set of car cup holder coasters to show you today. I've altered these before, years ago and I decided I'd do a couple more with my vintage stamps. I had used some SU! stamps before with Sharpie markers, this time I used Tim's stamps, The Girls and Copic markers with a little distress added in!
These coasters are so simple to make and make cute little gifts for men or women.
I picked these up at the dollar store, it doesn't matter what picture you chose on the front, because you alter the back of the coaster.
I used my Ranger Archival Jet Black ink to stamp the images on the coasters. I used one stamp on each coaster, these stamps were perfect for that. I added some Archival Coffee ink around the edges with my blending tool. I colored my images with Copic markers in E00, E37, E31, G82 & BG72.
I used my Gelly Roll Stardust pen on the little girls pearl necklace for some bling.
Remember, you can pick up all of the supplies I used at Inspiration Emporium and use my coupon code ieirisgarden for your discount at check out!! Just click on the links to get to the items.
Here they are in my car. It's fun to look down and see these in the cup holders :)
~~~~~~~~~~~~~~~~~~~~~~~~~~~~~~~~~~~~~~~~~~
Now, onto my rant :/
I've been having so much trouble with Blogger on my PC. I can't upload pics at all anymore, and this morning I couldn't post my blog winner post and I didn't even have any pic's. It works just fine with my laptop, weird, huh? I'd rather use my PC for blogging but, Blogger just won't work for some reason. Does anyone have any ideas for me? It's really frustrating!
~~~~~~~~~~~~~~~~~~~~~~~~~~~~~~~~~~~~~~~~~~~~~~~~~
Thanks for stopping by!
Smiley from millan.net


the winner is....

...MB Isaac
Love the mixed elements! beautiful..... I am new to stamping and having a blast - glad there are blogs like yours to visit for motivation and inspiration.
Congtrats MB, I'll be emailing you shortly for you mailing address.
I'm going to add a couple more Crafty Secrets goodies in addition to your American Beauty stamp set, have fun and thanks for visiting my blog!
Smiley from millan.net

Tuesday, June 12, 2012

Crafty Secrets American Beauty and a give-away!

Just think, in less than a month it'll be time to celebrate the 4th of July!
Now would be the perfect time to get started on those BBQ invites and cards. 
Sandy at Crafty Secrets has the cutest new set called American Beauty. 


There are so many stamps on this set including my fave little Campbells soup kid!
I used 10 of the stamps on my journal pages and I used the Artsy Banner set for the banners along the top and bottom, I stamped them with Archival Jet Black ink on an old book page and cut them out. I stamped the inside of the top banner with one of the star stamps with Archival Vermillion ink, then I put Fired Brick Distress Stickles in the center of the stars. 
The page backgrounds are made with Dylusions spray inks in postbox red, london blue and a spray water bottle. I used my new Distress Markers, L  O  V  E these markers, to do my coloring on the
Campbells kid, flags around the borders and the lady. 
I was looking at the pages later and decided I wanted to try some doodling and out lining like I see on so many journal pages people make. I didn't do much, but, I thought it really added to the pages. I used my Gelly Roll white pen and a black fine tip pen.
The white-ish circles are made with Dylusions 5x8 Dotted Flowers stencil. I layed it on the page and sprayed water on it, blotted the excess water and dried it with my heat tool.
~~~~~~~~~~~~~~~~~~~~~~~~~~~~~~

It just so happens I have an extra American Beauty stamp set and I'm going to give it away to one of my readers! All you need to do is leave a comment on this post for your chance to win, I may throw in an extra item or 2 or 3!
I'll pick the winner Monday, June 18th.
~~~~~~~~~~~~~~~~~~~~~~~~~~~~~~~~~~
Have a great day, thanks for stopping by!!
Smiley from millan.net

Tuesday, June 05, 2012

journey in the sun ~ inspiration emporium

Good Morning!
It's challenge time again at Inspiration Emporiam.
This month the theme is sunshine/beach.
I got out all of my Dylusion stamp sets and spray inks and made this scene.
I used the houses from the Right Up Your Street set, the sail boats (hats) from Doolally Dorris set, the small circles on the sun from the Love Struck Lucy set, the sunrays (hat) from the Bits and Bats set, Journey from the Word Love set. The "in the" stickers are from idea-ology chitchat verbiages tablet.
I wrote the "sun" with a black Copic marker.
To begin, I sprayed my pages in my journal with water, then I used my spray inks and and sprayed Pure Sunshine for the sun, Londen Blue for the sky and Vibrant Turquoise for the ocean. I wiped off the excess with paper towels. I dried the inks with my heat tool and then I stamped everything with Ranger Archival Jet Black ink. I did my coloring with the inks sprayed on my craft sheet and my fine tipped water brush. I used my GellyRoll white pen for accents.
The beach is Muddpuddles Malibu Beach that I got at CHA a few years ago. It's sticky, I guess it has glue in it. I spread it across the pages and after it dried I added Distress Stickles in Antique Linen across it with my finger for some sparkle. I put Rock Candy on the sun.
I hope you can play along this month, don't forget to use my coupon code ieirisgarden if you order for your discount at check out!
If you don't own any sun/beach stamps, just use what you have and use your imagination like I did!  Go check out all the details at the Inspiration Emporium blog, you never know, you might be a winner!
~~~~~~~~~~~~~~~~~~~~~~~~~~~~~~~
I hope you have a great day, thanks for stopping by! 
Smiley from millan.net

Thursday, May 24, 2012

pre-school grad gift

Good Morning!
Today is graduation day for Jasmine, she's going to kindergarten next school year!
She's so excited to start school!
I made her a little gift filled with tags with pictures on them and we'll stuff some cash in there for her.
I used the new cd3 Creating with Vintage Typography from Crafty Secrets. See the little streamers hanging from the flower? I printed those from the CD and I printed all the tags too.
It so super simple to make a quick gift, like I did here.
I used some supplies that were already on my table, the Artsy Banners stamped book page, flower and lace. I love when it works out like that.
I can't remember where I got the bandaide tin, I've had it a long time.
Since I took these pictures, I've punched holes in each tag at the corner and put them through a binding ring. I thought she would keep up with the tags better that way.
I punched various pictures of her into 1 1/4" & 1 1/2" squares and adheared them to the tags, I distressed around each one with Distress Vintage Photo ink and a blending tool, then I added the ribbon and buttons, so easy!

See all the tags, they are gorgeous!
 ~~~~~~~~~~~~~~~~~~~~~~~~~
~~~~~~~~~~~~~~~~~~~~~~~~~~~
Have a fun safe weekend!
It's already a mad house around our tiny town!!
Smiley from millan.net
Related Posts Plugin for WordPress, Blogger...