Monday, November 11, 2013

and the winner is.......

..... Sheri!

Congrats Sheri, you're the winner of my give-away! 

Blogger Sheri said...


I think it is a great idea. In fact, I have often thought about how to run a "rent a stamp" store somewhere. Sometimes you buy a stamp and only can use it a very few times as it is specific, like Christmas card stamps. Once you have made them, you want to make something different the next year and then this years stamp sits and gathers dust. However, someone else could use it and pass it down from there. 
I'll be contacting you shortly, Sheri!
~~~~~~~~~~~~~~~~~~~~~~~~~~~~~~~~
I want to thank everyone for playing along.
I will be giving gently used stamps in my future give away's :)
I'm hoping to do these give away's more often, maybe in a few days, stay tuned!
 From Millan.Net

Friday, November 08, 2013

shiny brite Christmas

I got into my Tim Holtz 8x8 seasonal paper stash and found the shiny brite paper.
I love shiny brite ornaments and other vintage Christmas ornaments. I have a collection I keep in my cabinet on display all year long, they make me happy!
Total inspiration for these art journal pages.
I had loads of fun using my stencils.


supplies: stamps - tim holtz numeric set. unity inspire words by donna downey. ink - archival vermillion, red geranium, olive, fern green, sephia. faber-castell black, chromium green opaque, deep scarlet red big brush pens. sakura micron 08 black pen. paper - donna downey art journal, tim holtz 8x8 seasonal paper pad, terminology tissue wrap, tissue tape, prima chalk board paper notecards. acces. - gesso, embossing paste, white sharpie paint marker fine tip, antique linen distress stickles. tools - tiny attacher, cosmetic sponges, star punch, tim holtz rays and bubbles stencils.dylusions 9x12 let it snow and 5x8 oh christmas tree stencils.

That's it, I hope you like the pages!
I'm feeling all Christmasy now, slowing getting in the spirit :)
Have you got your Christmas spirit on yet?
It'll be here before we know it!
Remember, when you're shopping at Inspiration Emporium use my coupon code ieirisgarden at check out for a 10% discount!
~~~~~~~~~~~~~~~~~~~~~~~~~
Don't forget to comment on my give away here, you have until Monday the 11th to enter!
Have a great weekend!
From Millan.Net


Monday, November 04, 2013

give away give away give away!

Hey bloggers!
I've decided to do a give away. 
It's been forever since I've done one.
I was going through my supplies, doing some storage, moving around and purging.
I've worked on design teams and I've collected so much stuff that I just can't ever use it all, you know?
So I'm giving some away, selling some. 
In this give away I have Crafty Secrets Homemade, Christmas and Birds Images and Journal Note pads.
CS Birds and Blossoms 3D Shadow Box Die and cards kit.
CS Altered Fairies 3D Shadow Box Die kit both by Vicki Chrisman.
 CS Feathered Friends Cotton Scraps
CS Best Buds Vintage Postcard Kit
~~~~~~~~~~~~~~~~~~~~~~~~~
What do you think about putting gently used stamp sets in give away's?
In the comments section leave me an answer to that question and I'll pick a winner Monday, Nov.11th.
Please leave me your contact info so I can get your goods to you!
~~~~~~~~~~~~~~~~~~~~~~~~~
Thanks for playing along!
From Millan.Net


Saturday, November 02, 2013

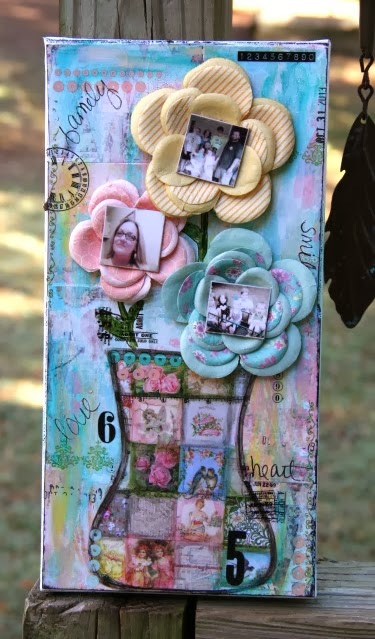
bouquet canvas

Hi bloggers!
I decided to do a canvas. 
I've been loving the canvases Christy Tomlinson does so the inspiration for this one came from her!
I covered the canvas with paper from the Prima Divine 6x6 pad. I went over that with Adirondack snow cap paint dabber and Claudine Helmuth classic teal, traditional tan, painterely pink and yellow pastel paints, I applied those here and there with my finger.
This is the first time I've used her paints and I have to say, I love them! They are so creamy and nice to work with. I got the urban mini paint set from Inspiration Emporium, I need them all!
I drew the vase on the back of a piece of the Divine paper, cut it out and adhered it to the canvas.  I painted over it with matte multi medium to make a non porous surface so when I did my shading I could move the ink from the pens with my finger. I did the shading with Faber-Castell big brush pens in cold grey 233, medium flesh 131, cadmium yellow 107, chromium green opaque174 and black199.
I used a bunch of rub ons from imaginise dream come true, which IE has on sale for $1 right now!! tim holtz remnant rubs numbers and Heidi Swapp.
I used Prima Divine flowers. I pinched the centers out of each one so my pic's would lay flush on the flower.
I cut the pics in squares to match the little squares in the vase.
I wrote some words on the canvas with Sakura Micron 08 black pen. 

I hope you enjoy the canvas and are inspired to make one of your own!
~~~~~~~~~~~~~~~~~~~~~~
I saw this on Pinterest and loved it. 
I had been wanting to do something like this with my cigar boxes for awhile and this pushed me on to do it!
I have a huge collection of cigar boxes, mostly wooden ones of all different sizes. I made holes in them with my awl with is basically a short handled ice pick. I used some metal name plate thingy's and brads to attach them to the boxes. I stamped the words on some cardstock to put behind the plates, so I can change them if I need to. I glued down some of the torn paper on them with matte multi medium.
My Claudine Hellmuth mini paint bottles are in the top one :)
~~~~~~~~~~~~~~~~~~~~~~~~
Have a great weekend, thanks for looking!
From Millan.Net

Sunday, October 27, 2013

halloween handy tags journaled

Hello bloggers!
This is my last post before Halloween. 
I've journaled my handy tags that I showed you here. You can get the supply list and how to's for the tags there.
I like to put my journaled tags in my Dylusions journal since it's a big journal.
I made a Distress spray with my shabby shutters reinker and water in a mini mister. I sprayed the journal page dried it and started using several stencils with Dylusions spray ink in black marble and melted chocolate. I used my Archival fern green ink pad with a cosmetic sponge and the burlap stencil. I used the melted chocolate and black marble sprays with the splatters and stripes stencils. I put apothecary remnant rubs here and there.
I was digging through some things and found these huge Prima flowers and leaves. I stamped the flower with the little number stamp from Wendy Vecchi's be inspired stamp set and Archival jet black ink. I attached the flower to a burlap flag along with a journaling ticket that I put tissue tape and vintage ribbon on. The x's are a Glitz large roller doodle stamp, fun for adding texture!
There are 3 stencils in this corner, the stripes, burlap and splatters, I love using stencils! The red drops are red pepper alcohol ink.
~~~~~~~~~~~~~~~~~~~~~~~~~~~~~~~~
That's it, I hope you like the page!
Have a fun and s p o o k y Halloween!

From Millan.Net

Friday, October 18, 2013

breast cancer awareness month

Happy Friday bloggers!
Since October is breast cancer awareness month I wanted to do an art journal page to honor the people who have had to suffer through this.
I wanted it to be pink, pink and more pink!
The angels skirt is made with pink and white ribbons.
I found the quote when I did a search for it and I thought it was perfect.
I'll list the supplies I used at the bottom and give a little explanation of how I used each one.


 Supplies: stamps - wendy vecchi ribbon stamp (along the tops and bottoms of each page), be inspired set (flowers), speckle stamp by su! (for texture), christy tomlinson she leaped stamp by unity (the angel). paper - donna downey journal, tim holtz vintage shabby paper stash (the background papers and banner) white cardstock (the girl). ink - archival rose madder (used with stencils and ribbon stamp), jet black (the girl, the flowers, texture and distressing), distress vintage photo (distressing the banner pieces, hope ticket and heart), copic markers rv11, rv10, e57, e00 (to color the girl), faber-castell big brush pens in medium flesh and white (to color the flowers and outlining the flowers and banner) and cold grey (for outlining the flowers and banner), black micron pen 08 (for doodling and outlining the banner). acces. - gesso (used with the stencils), embossing paste (used with the bubbles stencil), matte multi medium, distress paint in spun sugar (mixed with the molding paste for a light pink color), tim holtz adage tickets - hope, tim holtz label letters (for the quote), pink flower eyelets, glitter (sprinkled on the molding paste while it was wet and on the girls wings), ribbons (for her skirt). tools - dylusions dotted flowers stencil, prima chevron stencil, tim holtz burlap, bubbles and rays stencils, blending tool, crop-a-dile.
~~~~~~~~~~~~~~~~~~~~~~~~~
That's it, I hope I gave you a little inspiration today!
Don't forget to upload your faux creation at The Journal for your chance to win a $50 shopping spree at Inspiration Emporium! 
~~~~~~~~~~~~~~~~~~~~~~~~~
Have a great weekend!
From Millan.Net

Friday, October 11, 2013

she designed a life she loved

 Hey bloggers!
I did my first page in my new art journal and I love this journal!
The only thing is I've never used an inclusion  like this in anything. There are envy's, file folders and tags between the pages that need to be altered. It will be a challenge for me to use those unless I use them for the sentiments only, hmmmm. I'll have to ponder that.
 I got my new Prima doll stamp and I wanted to use her right away. I love her, she's not a little girl or a beauty queen, she's a pretty lady :) I paper pieced her dress and headband with paper from the Prima 6x6 Nature's Garden paper stack. The hearts and scallops on the bottom are from the stack. The background is torn pieces from the paper stack too.
I used some of my vintage lace and that flower, I don't know what it was used for, it looks like it's been crocheted or tatted on.

I've been pinning quotes on Pinterest to use in my journaling.
There are the eyelets I'm using up. I remembered them at the last minute :)
I've been having fun using remnant rubs and rub-ons. I love the little words in Tim's words rubs, they were perfect for the hearts.
I distressed some Prima wood flower embellishments with distress paint and stamping. I had some punched scalloped circles from sewing pattern tissue on my desk, I backed the flowers with that and punched small circles from the paper for the center of the flowers.

Supplies: stamps - prima mixed media doll stamp, sunrise sunset set, tim holtz tall text set. paper - prima tag pad (I stamped the doll on a tag and cut her out), prima 6x6 natures garden paper stack. ink -microm 08 black pen, archival jet black ink pad, copic markers 100 and e57, faber-castell black big brush pen. acces. - matte multi medium, embossing paste,  distress paint in spun sugar, broken china, bundled sage, gathered twigs. prima wood flower embellishments, eyelets, tim remnant rubs words, kaiser rub-ons, vintage lace. tools - mini silhouettes die set, prima stencil, mft jumbo scallop die, circle punch, heart punch,  glue gun.
~~~~~~~~~~~~~~~~~~~~~~~~~~
Have you uploaded your "faux" project over at The Journal yet? You could win $50 in supplies from Inspiration Emporium if you're the winner. You really need to give it a go, it's always fun to shop for free, right? You can always use my 10% discount using the code ieirisgarden at check out.
~~~~~~~~~~~~~~~~~~~~~~~~~~
Oh, Oh, Oh! I made Tim's blogworthy links list today, From Millan.Net totally M.A.D.E. M.Y. D.A.Y.!!

Have a great weekend!
From Millan.Net

Friday, October 04, 2013

hands full of treats tagged

Happy Friday bloggers!
I've got more Halloween tags to share along with some creepy "handy" treat bags.
I pinned this super cute idea I found on Pinterest using disposable vinyl gloves.
I filled them with Halloween pencils, candy, bracelets, earrings and even a Razorback coin holder!
I made these for a few of my fave goblin's :)  
 I'll give you some links at the bottom of this post for the supplies I used. If you have any questions about anything I've done just shoot me an email!

 I was inspired by Donna Downey to use up certain things on your projects that you have hoarded. I decided I'm going to try and use eyelets on all of my projects in some way. I have SO MANY of them and I hate to throw them away. I couldn't sell them either because everyone has them I'm sure! So, I'm on a mission!

 supplies: stamps - Tim Holtz seasonal catalog and halloween blueprint. paper - #5 manila tags, Tim Holtz seasonal 8x8 paper stash, black and white cardstock. ink - dylusions black marble ink spray, distress weathered wood and rusty hinge ink pads, rusty hinge, peeled paint and barn door (for the blood drops, ewwww) reinkers, archival jet black, faber-castell black big brush pen. acces. - vinyl disposable gloves, Tim Holtz apothecary remnant rubs, tissue tape, black and orange eyelets, Tim Holtz label letters, crinkle ribbon, black twine. tools - crop-a-dile, Tim Holtz bats and crossbones garland die, water brush, blending tool, matt multi medium.
~~~~~~~~~~~~~~~~~~~~~
That's it, I hope you like today's project!
The Journal September challenge "faux" is being carried over through October! If you didn't get a chance to play along now you can! Upload your faux project, you could be a winner!! Free supplies are ALWAYS good :) You can always use my discount code ieirisgarden for 10% off your entire purchase at Inspiration Emporium!
~~~~~~~~~~~~~~~~~~~~~
Have a great weekend!
From Millan.Net


Saturday, September 28, 2013

sentimental journey

Good Morning bloggers!
This is my last creation for September.
Can you believe October is around the corner? Summer went by way too fast, I'm not ready for winter.
Anyway, I've got a tag to show you today using the new Tim Holtz Framed Silhouettes stamp and die set. 
 I covered a #8 manila tag with paper from the Prima Divine 6x6 paper pad. I stamped the frame with VersaMark ink and heat embossed it with gold embossing powder. Then I stamped the lady head with Archival jet black ink and die cut the frame and head with the dies in the set. I put her head on a piece of the Prima paper, adheared it to the frame and filled the center with Crackle Accents for a cracked glass look.
 Next came the bouquet of flowers. I colored the stamp with Distress Markers in worn lipstick, peeled paint and weathered wood. I used the old huffing trick to moisten the ink and stamped it. Then I cut that out with the die from the set and added the Kaiser pearls and rhinestones. I inked the stamp again and stamped it on the bottom left.
Next, I stamped the crinkle ribbon with Archival cornflower blue ink and cut it out with the die in the set. I went over it with some cornflower blue ink and my blending tool. The butterfly was laying on my desk so I added it to the tag. It's made using chipboard, the mini butterflies die set, picket fence crackle paint and glitter.
The sentiment is from Tim's chitchat verbages. I distressed the stickers with Distress Walnut Stain ink and a blending tool. I went around the edges with my tracing wheel. The crinkle ribbon is colored with bundled sage Distress Stain.
~~~~~~~~~~~~~~~~~~~~~~
That's it for September! Hope you like the tag!
Remember to upload your creation for the September challenge over at The Journal, it's not too late!
You can always use my discount code ieirisgarden at checkout for 10% off your purchase at Inspiration Emporium!
~~~~~~~~~~~~~~~~~~~
Have a great weekend!
From Millan.Net

Tuesday, September 17, 2013

night moves

 Hey bloggers!
Here I am with another spooky journal page.
When I started I wanted to do a night scene with a picket fence in the foreground. 
The skull is the eerie moon!
I've had this fence idea rolling around in my head for awhile as soon as I got the stamp. 

 I started by painting the page with gesso, drying that and spraying with water before I started spraying the Dylusions ink. I used black marble for the sky adding more water and dabbing with a paper towel until I got the look I wanted. 
For the ground I sprayed water and then the melted chocolate and cut grass, again, I used the paper towel moving it around until I liked the look. Next, I added Archival cornflower blue and watering can with my blending tool to give it a little color. I did the same at the bottom with coffee and olive ink.
I used the Prima 6x6 cracked stencil and Dylusions black marble ink here and there for some texture.
I stamped the fence along the bottom, the trees, birds and cat from Dylusions bits and bats stamp set with Archival jet black ink. I colored the fence with gesso, it blended with the ink on the page and toned it down so the white wasn't so bright, perfect! I stamped the skull from Tim's Apothecary set on book paper and colored the teeth with my Gelly Roll white pen. I used the 31 from the numbers Remnant Rubs on his forehead. I cut him out and adheared him to the page with matte multi medium and went around the edges with it so my black Faber-Castell big brush pen would stay wet enough for me to smear the ink with my finger. I colored the trees, birds, spider and cat with the pen so they would stand out more.
I put the words from the Apothecary remnant rubs in the fence posts, the fence says it all with the perfect Halloween words!
I finished it off with tissue tape all around the edges.
I hope you enjoy the page.
~~~~~~~~~~~~~~
Have you uploaded your entry in The Journals monthly challenge?
You really should, you could win $50 in Inspiration Emporium goodness!
Remember, you can always use my discount code ieirisgarden for 10% off your order!
~~~~~~~~~~~~~~~~~~
Have a great day!
From Millan.Net

Related Posts Plugin for WordPress, Blogger...