Wednesday, May 28, 2014

celebrate father's day

Hello!
I made a card to go with the paperweight I made last week.
It's for the celebrate challenge going on at the Inspiration Journal.
The papers I used are from the Kraft Resist paper stash, 8x8 collage paper stash and a piece of scrap black cardstock. I cut the clock, card,  frame, frame background and diamond strips from the 8x8 collage paper. The clock hand is a game spinner.  
I stamped the frame in VersaMark ink, sprinkled on some pumice stone Distress embossing powder and heat set it with my heat tool. I die cut the frame with the Sizzix Framed Sihoulettes frame die and distressed the edges with Distress vintage photo ink. The guys head was cut with the die from that set.
The diamond strips were cut with the Sizzix Borders dies and I put 3 mini fasteners in the bottom strip for a little interest.

Here's the link to the paperweight.
~~~~~~~~~~~~~~~~~~~~~~~~~~~~
That's it, now head on over to the Inspiration Journal and upload your celebration creation for a chance to win some Inspiration Emporium $$$, you have until the end of the month so hurry!
Don't forget to use my coupon code ieirisgarden at checkout for your discount!
~~~~~~~~~~~~~~~~~~~~~~~~~~~~
Have a great day!
From Millan.Net


Tuesday, May 20, 2014

celebrate paperweight

Hello!
This months challenge at the Inspiration Journal is "celebrate".
So I've made a little gift for the father in my life, my Mr., Terry :)

My fave thing to do when I'm junkin' is to search for vintage items and bring them back to life, just like this paperweight. Whenever I see them cheap I'll pick them up so I have a few on hand.
I take the pictures out of them and get creating!
You can find vintage ones that are deep enough to add thick trinkets and such.
Like this one, I used Tim Holtz idea-ology findings.
This was really hard to photograph with the light reflecting off it, I'll do my best to tell whats inside.
I used a scrap from the Eclectic Elements Melange 8 piece fat quarter for the base, the one that looks like measuring tapes, I like the look of the fabric magnified, you can see the weave of the fabric.
 I took an old chipboard coaster from Chili's and traced the paper weight on it.

           I got this Peel n Stick fabric fuse at Walmart, you stick the fabric on it and cut it like cardstock, 
                                           no ironing needed for this, perfect for small projects!
I traced the chipboard circle onto the fabric and cut that out and then I had my base to glue my trinkets to.
I used a key, the keyhole has a tiny piece of scrap cardstock from the 8x8 collage paper stash glued to the back and then I filled it with Glossy Accents, there's a game spinner, a long fastener, a tiny flat washer, 2 mirrored stars and xoxo from Chitchat Verbages. 
After everything was glued down I glued the paperweight to the base with E6000.
Here's a picture of the supplies I used. 
Now, it's your turn to make a celebration project and upload it to the Inspiration Journal for a chance to win $50 in supplies from Inspiration Emporium!
Be sure and use my discount code ieirisgarden for 10% off your order!
Have fun!
~~~~~~~~~~~~~~~~~~~~~~~~~~~~~
From Millan.Net

Friday, May 02, 2014

pop it ups

Happy May!
The weather has been gorgeous the last couple of days, it just makes a person happy!

The tornadoes that went through north central AR. Sunday night were so violent, an EF-4.
There were 15 people killed, and so much property destroyed, I feel so bad for the families involved.
We broke in our new storm cellar that night and had 2 more families in it with us, the tornado sirens went off twice for the warnings we were under. 
I hope they are over now and we can enjoy this beautiful Arkansas weather! 

My card for the Inspiration Journal challenge is a Pop It Ups die card,
I love these fun cards. 
I've seen several vintage pop up cards in flea markets and they are always so pretty.
I'm so glad Miss Karen Burniston started designing them for Elizabeth Craft Designs, now we can make our own pop up cards! 
 The die set I used for this card is the Katie Label Pivot, there are several dies in the set to make different size labels, so fun! 
This is the second Pop It Ups card I've made, I'm still learning different ways to design them.
I defiantly want to order some more sets! 
supplies: paper - tim holtz vintage shabby paper stack, prima divine 6x6 paper pad. ink - antique linen distress stain. acces. - burlap, crinkle ribbon, kaiser rhinestones, prima wooden embellishments. tools - elizabeth craft designs katie label pivot die set,  mini tattered florals die set, 2 handheld hole punches, foam squares.
~~~~~~~~~~~~~~~~~~~~~
The challenge at the Inspiration Journal this month is Celebrate!
Weddings, birthdays, anniversaries or just because.
My card would probably fit the anniversary or just because I love you category.
Upload your celebrate creation this month for a chance to win $50 from Inspiration Emporium.
Remember you can use my discount code ieirisgarden for 10% off your order!
~~~~~~~~~~~~~~~~~~~
Have a great weekend!
From Millan.Net


Thursday, April 24, 2014

whisper a wish

Hello!
I've got more journal pages to show you today.
This months challenge at the Inspiration Journal is to use some of your fave supplies. 
I love using stencils, they really add the perfect touch for backgrounds in journals and mixed media. 
To start I glued down some paper from the Vintage Shabby paper stack and then I did stamping using the butterfly stamp from the Attic Treasures stamp set and the flower bouquet from the Framed Silhouettes Framelits Die Set using Archival cornflower blue and forget me not inks. I stamped the Hero Arts doily stamp with VersaMark ink and embossed it with white embossing powder and added my eyelets in the center. Next, I got out my Tim Holtz stencils, the rays, lattice work  and doily and used them with the Archival inks. I used the bubbles stencil and white embossing paste in the centers of the rays.
I die cut the butterflies with the mini butterflies die from white doily paper edging that I got from D. Bluemchen years ago. I put a Kaiser rhinestone on each butterfly.
 
I found the quote on Pinterest, my fave quote source!
I used my old SU! rough edges alpha stamp set for the quote with black archival ink.
That's it!
You still have a week or so to make your creation and up load it to the Inspiration Journal.
You can use my discount code ieirisgarden for 10% off your order at Inspiration Emporium.
~~~~~~~~~~~~~~~~~~~~~
Have a great day!
From Millan.Net


Tuesday, April 08, 2014

friendliest flower

Hello!
The new Dina Wakley stencils are in the house!
That's all I used for these journal pages.
I love these stencils, the leaves are gorgeous, the basic's can be used in so many different ways so can the faces! The Affirmations is a great background stencil, I love the quote.
The plan was to have a daisy, sunflower and a purple cone flower.
That all changed when I found the quote on Pinterest. 
Now they are daisies, friendly daisies. 
Don't they look like friendly daisies with their cute faces? ;)
On the background I used the Affirmations and Leaves stencils, I made the flowers with the half sun from The Basics stencil and the faces are from the Moon Faces stencil.
The light blue background started out Vibrant Turquoise, way too much, so I took it down with gesso.
I used Distress Paints for the flowers in Scattered Straw, Dusty Concord and Picket Fence. I punched the faces with a Marvy jumbo scalloped punch. I stamped the faces in Distress Vintage Photo on book text and distressed them with Vintage Photo and Archival Dandelion and Carnation Red on the cheeks. The leaves are Archival Fern Green.
Oh yeah, I used the French Script background stamp from SU! too, I'm sure it's retired now though.
I used it for some distressing, any script stamp would work.
As always I added 3 eyelets with my Crop-a-Dile.
I wrote the quote with a bronze Sharpie marker and outlined it with a Sakura Micron black 08 pen.
It's a line Meg Ryan used in 'You've Got Mail'.
Well, that's it!
This month at The Inspiration Journal the challenge is anything goes!
How fun is that, right? 
Remember, you can use my discount code ieirisgarden at checkout over at Inspiration Emporium!
~~~~~~~~~~~~~~~~~
Have a great day!
From Millan.Net


Friday, March 28, 2014

someone special

Hello!
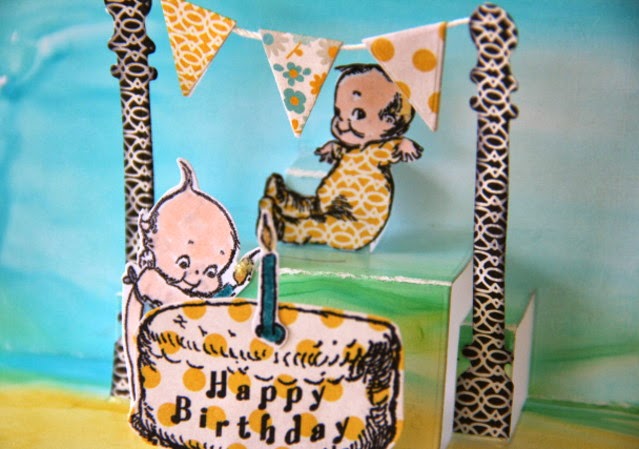
Today I have a card using the die set Lots of Pops from Elizabeth craft designs by Karen Burniston.
This is my first card using these dies and I must say, they are so much fun!
You can build the cutest scenes with this die set.
I used the paper pad Park Bench by Fancy Pants, it matched the ink colors perfectly!
The paper ric rac was cut with the MFT jumbo ric rac die and the scallop on the edges with the open scallop die.
I used a star on the sentiment tag.
 I had this piece that I made using Wendy Vecchi's Archival reinker technique.
I thought it would make a cute background. 
The stamping was done with the Crafty Secrets Kewpie's stamp set.
I went to the website and it looks like the set is sold out, but, there are more Kewpie sets for sale.
 The reinker colors are Archival dandelion, forget me not and the stamping was done with jet black.
I used Distress Markers and Copic markers for the coloring on the Kewpie's.

Thats it!
I hope you can upload your colorful creation to The Journal for a chance to win some spending money at Inspiration Emporium. Remember, you can use my discount code ieirisgarden for 10% off your oder!
~~~~~~~~~~~~~~~~~~~~~~~~~~
Have a great day!
From Millan.Net

Friday, March 14, 2014

love always

My goodness.
Seems like it's been forever since I've been here.
Totally uninspired. sick. weather. stress. ugh.
Things seem to be looking up, yay :)
 This months challenge at The Inspiration Journal is all about color!
A perfect time to try out Wendy Vecchi's new technique using her Archival reinkers.
you can  make beautiful, simple backgrounds or diecuts like I did!
For my journal background I started by applying some gesso, I dried that and put on tumbled glass distress stain, I painted it on and dried that and then I put on elements and symphony tissue tape small pieces to cover both pages. I painted on some more gesso to tone it down. Next I used the doily stencil and applied distress bundled sage ink over the pages. Last, I stamped some dots on with a Dylusions basic backgrounds stamp with forget me not ink.
I had some corner pieces of paper doilies that I had used on another project and glued one on each page and the inclusion. I cut a gold foil doily in half and put one piece on each side of the inclusion. I used a 5/8" circle punch and punched gold centers for the flowers.
 I used the Jumbo Tattered Florals die to make the flowers and leaves for the journal pages.
I used Archival reinkers in forget me not, orange blossom and carnation red. 

 The 'love always' is transparent diecuts by Studio Calico. I covered the words with Glossy Accents and sprinkled on turquoise glitter. After they dried I spayed a matt sealer on them to keep the glitter from coming off so much, it worked really well.
I sprayed the flowers with Goosebumps texture spray to give them a little texture. You can see it pretty good in this picture. I love that stuff!
That's it!
It's your turn to upload a colorful creation to The Inspiration Journal for your chance to win $50 to spend at Inspiration Emporium. You have until the end of the month, plenty of time!
Don't forget to use my discount code ieirisgarden at checkout for 10% off your order!
~~~~~~~~~~~~~~~~~~~~~~~~~~~~~~
Have a great day!
From Millan.Net


Monday, February 24, 2014

tattered floral key ring

Hello, hello!
I have a key ring to show you tonight.
When I saw the new cable binder rings Tim Holtz came out with I was SO excited, I used to have a key ring just like it. It's perfect for holding odd size keys like my car key on this one and the keys are super easy to attach to the ring, I really like that!
Binder rings are not just for binding!
I used my new Jumbo Tattered Florals die and cut 2 flowers and 2 leaves out of shrink plastic. I colored them with alcohol inks in cranberry, denim and bottle using an applicator felt. 
I added some design on the leaves with a Prima Finnabair texture stamp and Archival jet black ink and on the denim flower I used a pencil eraser for the dots and jet black ink. 
I punched a hole in a flower petal with a 1/2" circle punch. I wanted a bigger hole so the flower could move freely.
Next, I shrunk the flowers and leaves with my heat tool and glued them together with E6000 glue and added the mirrored star.
There we have it, super easy to make and with all of the large dies and stamps out there, and now binder rings, cute key rings can be made!
~~~~~~~~~~~~~~~~~~~~~~~~~
Have you uploaded your project for the February challenge at The Journal? You have until the end of the month, it's all about quotes and words. 
Don't forget to use my discount code ieirisgarden for 10% off your order at Inspiration Emporium.
~~~~~~~~~~~~~~~~~~~~~~~~~~~
Have a good night!
From Millan.Net

Sunday, February 16, 2014

live simply

Hello friends!
The sun is shining so pretty today, sure does uplift the spirits!
Spring may be around the corner, I hope so!

I got my new Jumbo Tattered Florals die and I LOVE those huge flowers! Just think of all the pretty things you can make with this die! I have to get my hands on some of  Tim's Ecletic Elements fabric, I know flowers made from that fabric would be gorgeous!

To start, I covered a deep 6x12 canvas with old sewing pattern tissue and Melange tissue wrap. 
I painted on some gesso to tone it down a bit, lightly, not covering the whole thing. 
First I used my archival cornflower blue and french ultra marine inks and the stripes, burlap and bubbles stencils for the 'sky' at the top. Next, I used my rays stencil for the 'sun' with some metalic gold embossing paste. Oh my, that stuff is gorgeous! I toned it down with gesso, it was too bright for what I was going for, but, wow, I love it! For the green 'grass' at the bottom I used the honeycomb stencil with archival fern green ink. Then I added some texture with a Prima Finnabair stitching stamp and jet black ink.

 I cut the flowers out of book paper, a large paper doilie, burlap that I painted with gesso and a foil sheet. I adhered a book paper flower on the foil flower so it would be bendable. I painted everything with gesso, even the mirrored stars in the center. I used a pipe cleaner for the stem, I painted it with gesso and some bundled sage Distress paint. I spray painted the burlap leaves with some bundled sage paint and water in a mini mister, tah-dah, spray paint! 
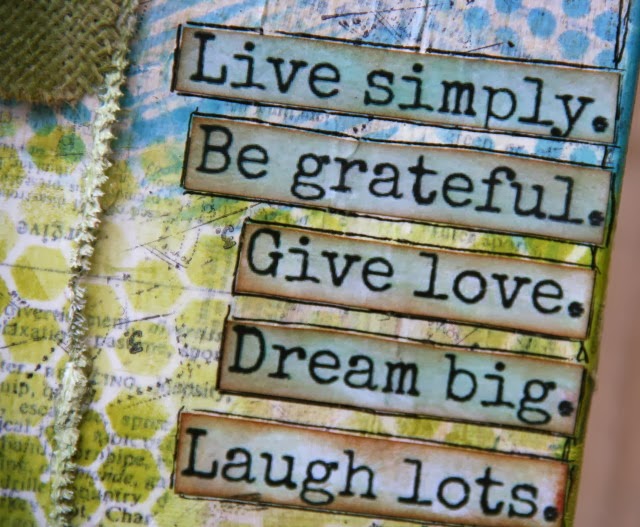
 I printed the quote from Pinterest. I loved it.
This months challenge theme at The Inspiration Journal is quotes/words.
Anything with a sentiment, quote or a word or 2 on your project, so easy!
You still have time to upload your project for a chance to win $50 to spend in Inspiration Emporium, shopping always makes me happy especially when it's free, right?
Remember, you can use my code ieirisgarden for 10% off your order!
~~~~~~~~~~~~~~~~~~~~~~~~~~
Have a great day!
From Millan.Net

Monday, February 03, 2014

time for love

Hello friends!
I finally altered my Tim Assemblage Clock
It took me forever to get this to come together. 
I just was not happy with every idea I had until this one and I really love it!
Since February is the month of love that's the theme I went with.
 To start I took the glass out of the clock so I wouldn't mess it up when I painted it.
It was easy to take out, I slid the 2 little metal bracket thingys on the bottom over with my fingers to release the glass and I slid it out. Then I painted it with 2 coats of gesso. I sprayed a matt sealer on it, thinking it might keep the gesso from chipping off. You may not have to do that though.
I cut paper from the Fancy Pants Park Bench 6x6 pad and I cut the heart from Primas Anna Marie 6x6 pad and adheared it to the back of the clock. This piece comes right off the back of the clock to get inside.
I cut the cupid and heart from chipboard and covered them with glitter. I printed a picture of me and Terry in black & white and cut it and adhered it to the heart, but, it was so dark and it wasn't working for me, so I painted gesso over it and sprinkled on the glitter. Glitter makes everything better! I colored the white Kaiser Pearls with a Copic marker r27 to match the red heart.
I cut a burlap flower with the Tattered Florals die. I had some lace flowers in my stash that I made, you can see the tutorial here. I put the glass back in and glued all the flowers and cupid inside with a hot glue gun.
I colored some crinkle ribbon with some watered down Distress Stain in Fired Brick made a bow, hot glued it to the outside and put some heart trinket pins through it.

What are you making for the love month?    
You can get all of your love supplies at Inspiration Emporium and you can get 10% off your order using my coupon code ieirisgarden!
~~~~~~~~~~~~~~~~~~~~~~~~
Have a great day!
From Millan.Net


Related Posts Plugin for WordPress, Blogger...