Tuesday, August 28, 2012

Inspiration Emporium Challenge~ shrink plastic

It's Inspiration Emporium designer challenge time again!
This challenge is shrink plastic. I knew I wanted to make a flower so I used Alterations bigz die Tattered Florals to cut the shrink plastic.
I stamped the leaves with Dylusions Doodle Parts and Archival ink and cut them out. The hand is from Tim Holtz Oddities  stamp set, stamped with Archiaval Jet Black ink and cut out.
I used my heat tool to do the shrinking. I didn't want the flower to shrink out flat so I just heated it enough to curl it, same with the leaves, I wanted more dimension. I added more color with q-tips and archival ink. Next, I glued all the layers together and glued on the pearl brad.  I covered the small tag with paper from Tim's idea-ology vintage shabby stack, went around the edges with my tracing wheel for some faux stitching. I added the sentiment with words from idea-ology chit-chat verbages.
I wrapped vintage lace around an old wooden spool and attached the tag.
I hope you order some shrink plastic and play, it's so fun watching the shrinking process!
Remember to use my discount code ieirisgarden for your discount!
Head on over to the IE blog and check out the other team members pretties!
~~~~~~~~~~~~~~~~~~~~~~~~~~~~~~~~~
Have a great day!
Smiley from millan.net

Sunday, August 26, 2012

Tim meets Dyan journal pages ~ BOO

It's journal time!
My fave kind of creating these days, it's just fun, no pressure for trying to do a new and different layout, just go for it, no right or wrong.
These pages are all Dyan and Tim, I had a lot of fun mixing their stamp sets and supplies. I think they worked great together!
First of all, I covered the pages with tim's Idea-ology Terminology Tissue Wrap. The way this is packaged is so cool, it's in a box like wax paper, you pull out what you need and tear it off on the metal edge. I painted my pages with Mod Podge and stuck the tissue paper down and dryed it with my heat tool. Next, I sprayed the pages with water and then sprayed on my Dylusions inks in cut grass, crush
ed grapes and squeezed orange. I wiped off the excess and dryed with my heat tool.The tissue paper shows through the ink, perfect!
Next it was time to stamp. I used my Archival Jet black ink and Tim's Apothecary set and Dyan's Bits and Bats, Traveling Travis and Doodle Parts sets. I used orange peel and lavender stickles on the legs and the skulls headdress and distress fired brick stickles oozing out of the skulls eyes- creepy! I stamped the big spider on the skulls head, it needed something :) The black birds are covered with Martha Stewart onyx glitter. I used some washi tape here and there and Dyan's dotted flowers stencil for the brown dots.   
I used my Gelly Roll white pen to make my polkadot spiders and smudged it around the tree. I did distressing around the edges of the skull and leggy girl with Archival Coffee ink and blender tool. I put Glossy Accents inside the glasses on the leggy girl.
Now, dig into your stash and get some great Halloween stamp sets from Inspiration Emporium and go have some fun!
~~~~~~~~~~~~~~~~~~~~~~~~~~~
Have a great day!
Smiley from millan.net

Tuesday, August 14, 2012

A Crafty Secrets Halloween

These are the new Crafty Secrets stamp sets.
Yes, we all know how I love Halloween and all things scarey, did you know I own every Stephen King book that he's written, read them all but the Dark Tower series, never could get into those. The man can scare you and crack you up all in one paragraph. Can you believe he was an english teacher before he made it big in writing?
OK, enough about Mr. King.
~~~~~~~~~~~~~~~~~~~~~~~~~~~~~~~~~~~~~~~~~~~~~~~
 The vintage images in these sets are so fun. The labels are perfect for your bottles of brew or signs like I used on the tag. I LOVE the chain stamp, it's so perfect with this set and for little details.
For the tag I added Distress Dried Marigold and Dusty Concord with my blending tool. I dipped a paint brush in water and flicked it on the tag for the water drop look. I think that adds so much to a distressed project.I used me Dylusions Luscious Leaves stencil on the top and right edge and dabbed on paint with my pitch black Paint Dabber, let that dry and added some highlights with my Gelly Roll white pen. I stamped the cawing crow candy label and colored it with Copic markers y15, yr18, g21, bv02 and e57. I stamped the spiders and the sign arm hanger thingy, I know there's a better name for it, lol, and chain. The Spooksville and little scene along the bottom are from the Jolly Hallween set. 
I finally jumped on the washi tape wagon and added a couple of pieces under the green button brads. I added black Kaiser rhinestones on the corners of the sign. The chipboard star is covered with Martha Stewart Onyx glitter. I colored the white seam binding with the Distress inks. I added a trinket pin and type charm C for candy :) through the ribbon.
~~~~~~~~~~~~~~~~~~~~~~~~~~~~~~~~~~
This is a atc card I made with the Jolly Halloween set.
I stamped the black cat sitting on the pumpkin on paper and did the cracked glass technique. I covered it with VersaMark ink and poured on clear embossing powder and melted it with my heat tool. I did that 3 times and put it in the freezer to harden up faster, then I bent it to get it to crack. I put it behind the Autumn Leaves silver frame. I used the Cracked embossing folder on the base paper and went over it with Distress Vintage Photo and Black Soot ink and a blending tool. I cut the strip of polkadot paper and used the lace stickers on the top and edges. I stamped Boo at the bottom and the cute little skeleton. I stapled on some black May Arts lace with my tiny attacher. The moon it covered with more Martha Onyx glitter.


~~~~~~~~~~~~~~~~~~~~~~~~~~~~~~~~~~~~~~~~~~~~~~~~I hope you have some fun with the new Crafty Secrets Halloween stamp sets, they are a must have for Halloween lovers!
Go check out Sandy's blog and see some more samples and what she's been up to!
Have a great day!
Smiley from millan.net


Wednesday, August 01, 2012

top dog mini

I RUFF Crafty Secrets, don't you? I just can't get enough of their stamp sets.
I just got the new Halloween sets, holy cuteness, Batman ;)
Today I'm showing you another couple of mini pages using the new Top Dog stamp set.  I'm an animal lover, I grew up with every domestic animal you can think of and not so domestic ones too, so these new sets are right up my ally! 
I decoupaged the background with papers I printed from the Creating with Vintage CD's. I tore some and cut some, just random paper scraps I had printed. I used some washi tape down the center to make it clean looking. I stamped the scallops on book paper with the Artsy Banners set using Archival Jet Black ink.
I used a chipboard fancy frame, they're sold out - but any frame would do - for the pup and the embossed alpha chipboard for the xo. I colored them with copic markers b21 and r27. I also used e31, e57, e37and rv11 on the pup. I put fired brick distress stickles on the xo and waterfall stickles on the frame.
The friends sentiment is mounted on a piece of cardstock cut with a Spellbinders scalloped rectangle die.
~~~~~~~~~~~~~~~~~~~~~~~~~~~
Check out the Crafty Secrets blog and see what Miss Sandy's up too! 
Have a great day!
Smiley from millan.net

Wednesday, July 25, 2012

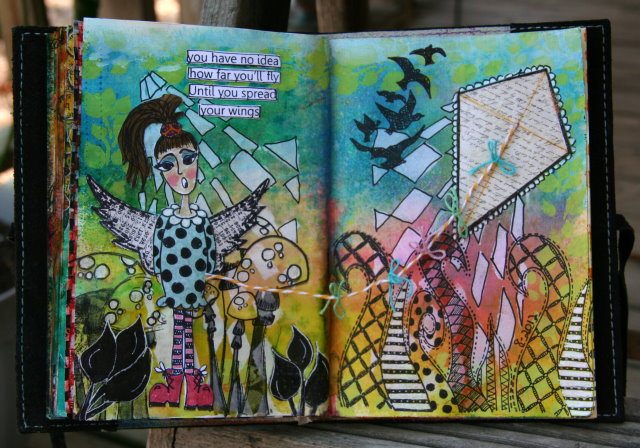
fly a kite

I'm at it again, I can't get enough, this journaling stuff makes me happy!
The August challenge at Inspiration Emporium is  fly a kite, how fun, huh?
I dug into my Dylusions stamps, inks, and stencils and went to town.
I always do my Dylusion journal pages the same, spray with water spray a few inks, dab it off with a paper towel and start my stenciling with paint or ink and stamping.
I made my own kite for this one, just drew it out on patterned paper, cut it out and added some rock candy stickles for some sparkle. I tied a tail with my string and tied little bows along the tail with more string.
I doodled around the kite to give it a little dimension.
The Dylusion stamp sets I used are doodle parts, love struck lucy, bits and bats and quintessential quotes.         
I did my stamping with Archival Jet Black ink, I paper pieced her dress and highlighted the black dots with my Spica black glitter pen. 
I did my coloring with Distress Markers, and my outlining with my Gelly Roll white pen and Trend Micro black 08 pen.
I had the most wonderful mail day yesterday, 4 new Dylusional stamp sets, Dyan's Christmas collection! Have you read her Christmas words set? It cracks me up, I love that woman, LOL! All of her new sets are in at IE, use my coupon code ieirisgarden for your discount!
Make sure you add your kite project to the IE Blog in August for a chance to win $50 in IE goodies!
~~~~~~~~~~~~~~~~~~~~~~~~~~~~~~~~
Man, we are burning up here. It's unusual if we have a high temp below 100, and no rain to speak of, maybe a  2 minute squirt every now and then. I know of farmers that are selling their cattle because the pastures are all dead and the price of hay is outrageous.
It's a sad situation. I've got the prettiest gardenia bush in my yard I've had for years, it's totally dead now :(
I hope y'all aren't as crunchy as we are here. 
Smiley from millan.net

Monday, July 16, 2012

Cutie Cats

I have a new journal.
I got this one at Hobby Lobby, it 's 3 3/4 x 5 1/4.
Crafty Secrets stamps are mostly small like most stamps and it's harder to fill a larger journal page, the way I like to journal , anyway.
So I thought this would be perfect for Crafty Secrets journal pages.
I used the new medium stamp set Cutie Cats for my first pages in this journal. I love cats, so, this was a no brainer :)
I used Dylusions spray inks in postbox red and pure sunshine for the background, I sprayed the pages with water first. I used Dylusions 5x8 dotted flowers stencil and dabbed the dots with white acrylic paint and a paint dabber. I watered down some of the white paint and flecked some on the background by tapping the paint brush with a pencil. I stamped around the edges with a line design stamp and paw prints stamps from the set. I used Archival Jet Black ink to do the stamping. I stamped both cats colored them with the ink sprays and a fine tip water brush. I found some of my old labels that I got in a box of stuff at an auction and used this postage one.
I put some old photo corners on each corner. I love the sentiments in this set, I used 3 of them here.
I put orange peel stickles here and there on the pages. I used my Sakura micron 08 pen to do outlining.
I put the journal on this clipboard to hold it open so I could get a good picture.
~~~~~~~~~~~~~~~~~~~~~~~~~~~~~~~~~~~~~~
Go check out the Crafty Secrets blog to see what Sandy has going on, there's always something fun!
~~~~~~~~~~~~~~~~~~~~~~~~~~~~~~
Have a great day!
Smiley from millan.net

Monday, July 02, 2012

red, white and blue ~ inspiration emporium

Good morning, friends!
It's that time of the month, when Inspiration Emporium has their monthly challenge!
Hmmmm, wonder what this month is.....yep, red, white and blue!
I did another journal project. This time I used gesso, for the first time!
I had some black showing through from the previous page and I needed to cover it up. So, I painted gesso on with a brush to start. Then I rubbed the pages down with my red pepper paint dabber. I made some dots on the background with my Dylusions dotted flowers 5x8 stencil with the gesso and a sponge dabber. I had some punched scalloped circles on my desk that I glued on and I die cut 3 stars and the flag with my mini old glory die out of Grunge paper.
I colored them and added Distress Stickles in Rock Candy, Fired Brick and a Stickles blue. The white stars are made with the "stencil" for the die, I dabbed them with gesso. I added some vintage lace die cut strips I had on my desk too, that's something I love about this journaling I do, just add anything and it works!
I used several of Dyan's Dylusional stamp sets, Further Round the Edge, Basic Backgrounds, Love Struck Lucy and Doodle Parts. I did my coloring with Copic markers b24, r27, 100, e00 and e57. I used my white Gellyroll pen and my Trend Micro black pens for the doodling and tracing. I did my stamping with Archival Jet Black, Vermillia and French Ultrmarine. I added the idea-ology numeral 4. 
That's it, now make your own red, white and blue project and upload to the Inspiration Emporium blog, you could when $50 in IE goodies, it's that easy! Don't forget to use my coupon code ieirisgarden at check out for your discount!
~~~~~~~~~~~~~~~~~~~~~~~~~~~~~~~~~~~~~
I hope you have a safe 4th, we are under a burn ban, so no fire works around here. All the shows etc. have been postponed till it rains. I'm looking at, oh, September, maybe ;)
Smiley from millan.net

Friday, June 29, 2012

fairies and pixies

Good Morning!
I have 2 atcs to show you made with the new Crafty Secrets Fairy Wishes and Pixie Dust stamp sets.
Oh my.....how cute are these sets?! Adorable!!

The one on the left is made with the Fairy Wishes set. I stamped the fairy, bird, xox and the scroll along the bottom with Archival Jet Black ink. The background papers are printed from the new Crafty Secrets  Creating with Vintage Typography CD. I colored the images with Copic markers e00, rv11, r83, bg72, g21, y17, y0000 and b21. I added glitter to her wings and Amuse twinkle stickers to her antennas and by the bird. I used my tracing wheel for the faux stitching around the edges. I used my blending tool and Distress Vintage Photo ink to distress the edges. I attached some May Arts zigzag velvet ribbon with my tiny attacher.
~~~~~~~~~~~~~~~~~~~~~~~~~~~~~~~~~~~~
For the rectangle one I used the Pixie Dust set. I used mostly the same supplies. The Copic markers I used are g82, yg23, bg72, rv11, e57, w3 and e00. I used some mini pompom trim. I stamped one of the flowers again and popped it up with a piece of a foam dot for a little dimension. 

Head on over to the Crafty Secrets blog and see what's going on, there is always something fun!
Have a great weekend, thanks for stopping by!
Smiley from millan.net

Tuesday, June 19, 2012

Inspiration Emporium ~ car cup holder coasters

Hi friends!
I have a set of car cup holder coasters to show you today. I've altered these before, years ago and I decided I'd do a couple more with my vintage stamps. I had used some SU! stamps before with Sharpie markers, this time I used Tim's stamps, The Girls and Copic markers with a little distress added in!
These coasters are so simple to make and make cute little gifts for men or women.
I picked these up at the dollar store, it doesn't matter what picture you chose on the front, because you alter the back of the coaster.
I used my Ranger Archival Jet Black ink to stamp the images on the coasters. I used one stamp on each coaster, these stamps were perfect for that. I added some Archival Coffee ink around the edges with my blending tool. I colored my images with Copic markers in E00, E37, E31, G82 & BG72.
I used my Gelly Roll Stardust pen on the little girls pearl necklace for some bling.
Remember, you can pick up all of the supplies I used at Inspiration Emporium and use my coupon code ieirisgarden for your discount at check out!! Just click on the links to get to the items.
Here they are in my car. It's fun to look down and see these in the cup holders :)
~~~~~~~~~~~~~~~~~~~~~~~~~~~~~~~~~~~~~~~~~~
Now, onto my rant :/
I've been having so much trouble with Blogger on my PC. I can't upload pics at all anymore, and this morning I couldn't post my blog winner post and I didn't even have any pic's. It works just fine with my laptop, weird, huh? I'd rather use my PC for blogging but, Blogger just won't work for some reason. Does anyone have any ideas for me? It's really frustrating!
~~~~~~~~~~~~~~~~~~~~~~~~~~~~~~~~~~~~~~~~~~~~~~~~~
Thanks for stopping by!
Smiley from millan.net


the winner is....

...MB Isaac
Love the mixed elements! beautiful..... I am new to stamping and having a blast - glad there are blogs like yours to visit for motivation and inspiration.
Congtrats MB, I'll be emailing you shortly for you mailing address.
I'm going to add a couple more Crafty Secrets goodies in addition to your American Beauty stamp set, have fun and thanks for visiting my blog!
Smiley from millan.net
Related Posts Plugin for WordPress, Blogger...