Have all you fan clubbers had fun playing along on the Dare To Get Dirty challenges at SCS? It's been a super fun week and there are 2 days left to get dirty! There have been tons of fabulous uploads from the the fan club members, WOW, they are amazing!!!
I'm hosting a challenge today, a chipboard challenge, go on over to SCS and check it out!
My challenge details are here, get the recipe for my sample card here.
If you're a SCS fan club member I hope you can play along, if not, go sign up here!
I hope you can play, I can't wait to see what you come up with!
This is the matching tin I altered, I just had to alter something :)
Monday, July 30, 2007
Saturday, July 21, 2007
inspire me funky
I wanted to make a notebook for sketches, tips, clippings and ideas. I found this one with grid paper in it at Office Depot. I love the grid paper for sketches.
I decided to put a big ol' honkin' flower on the front using my Pick A Petal set from SU! I love the Basic Grey Blush paper, I thought it turned out pretty funky!
I had the notebook done and ready for the sentiment in the bottom corner, I was going to use the standard 'create', had it stamped, punched and ready to go. Later in the day I was blog hopping and went to Nichole Heady's blog (have you seen her new studio pic's? OMW!) and she had linked to Jeanette's blog. I was drooling over her pic's and saw "Inspire Me" on a wall, PERFECT, love that! So, I went with "inspire me" for my sentiment on my notebook, I thought it worked!
Supplies: grid paper notebook, May Arts ribbon from StarLitStudio, Basic Grey Blush paper, vanilla cardstock, Ruby Red, Pumpkin Pie and Chocolate Chip classic ink, walnut ink, small copper flower brads by Making Memories, corner punch, 1/16" punch, corner rounder punch, small scalloped punch, scalloped scissors, sponge dauber, SU!'s little flower stamp from the Big Bold Birthday set, Pick A Petal set, and the swirly stamp from Baroque Motifs, metal book corners and setter, red button and E6000.
I'm headed to my mom's at Mtn.View, my niece Tracy from Springfield, MO. is there and Crystal and the girls, I'm sure we'll find some girly things to do!
Have a wonderful Saturday!
Labels:
Stampin Up
Monday, July 16, 2007
Heartspeak
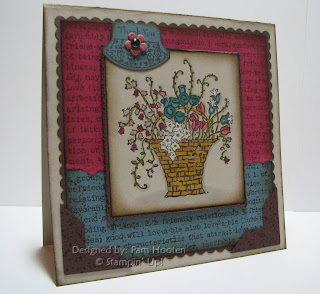
The flower basket image is from SU!'s new Heartspeak stamp set, I love this set! Lots of detail on the image for coloring. Love the vintage look of it too. Other new sets I used are Friend by Definition and Party Punch.
I colored it with my Copic markers and used craft white for the white flowers, just painted it on with a paint brush. I believe it was JulieHRR who said you could color brads with Copic's, I tried it on this silver brad, it works like a charm!
Supplies: Cardstock - Sahara Sand, Purely Pomegranate, Blue Bayou and Chocolate Chip. Ink - Copic markers, craft white, Chocolate Chip, Walnut by Ranger. Stamps - Heartspeak, Friend by Definition, Party Punch and Itty Bitty Backgrounds. Acces. - silver brad, 1/16" hole punch, round tab punch, corner punch, scalloped scissors, sponge dauber, dimensionals, cutter kit and a prima flower.
Thanks for looking!
Labels:
Stampin Up
Saturday, July 14, 2007
Daisy
I bought the Daisy stamp at the scrapbook store in Conway when it was having it's going out of business sale :(
I've been wanting to use it and I finally did.
I stamped the image on kraft cardstock with Noir Black palette ink from Eclectic Paperie and colored it with my Copic markers, you can get those from Ellen here.
I really like coloring on SU!'s Kraft and Sahara Sand cardstock, the colors look so rich!
Supplies: Cardstock - SU! Ruby Red, Always Artichoke, More Mustard, Basic Black & Kraft. Stamps - SU! Paisley, sentiment from Vases In Vogue & the Daisy stamp by Debbi Mumm from Stampington & Co. Ink - SU! Ruby Red & Always Artichoke, Basic Black marker for the faux stitching & Noir Black Palette. Acces. - Black brads, black eyelet, Crafters Tool Kit, corner punch with the guide removed to make the scalloped edge, small oval punch, small scalloped scissors, artichoke ribbon, gold cord & Dimensionals.
Seems I've been tagged by two of my buds, Cami and my neighbor Tex Ü
Thanks girls!
Here are the rules...
I must post 7 random things about me.
Tag 7 other bloggers to do the same.
Post rules and the bloggers I tagged here.
Leave tagged bloggers comments on their site so they know they've been tagged.
7 things about me...hmmmm...hope I can think of 7 new things, let's see.......
1. I love animals and hate to see them abused.
2. I love babies, did y'all know Bethie is having Siliaka #6 next week...so excited!
3. I had several box turtles as pets! Hubby built a pen in my backyard, they laid eggs, the babies were SO CUTE, itty bitty things. I let them go, got tired of cutting up worms for the babies, blech!
4. We had a baby deer someone found, she was tiny and spotted, her name was Iris Ü. We kept her until she started freaking out when we mowed the yard. A man came and got her that had a whole heard of them, I think she was happier.
5. I'm a HUGE Bare Escentuals & Philosophy junkie.
6. I love Asian food, especially when my sister-in-law makes her Korean specialties, YUMMAH!
7. 7 is my and HB's lucky number!
Now, I will tag 7 more friends of mine...
1. Debbi Thwaites - QC's Corner
2. Bevie Pearl - Step Away From My Scissors
3. Kendra Wietstock - Paper Dreams
4. Joy - The Joy of Stamping
5. Stephanie Staniak - Paper Bits & Ribbon Pieces
6. Valerie Stangle - stampin' gal val
7. Heather Nichols - pine is here
Labels:
other stamp companies
Saturday, July 07, 2007
hair clips & pouches
I've been trying to keep myself busy while I'm waiting on my MONDO first new catty order from Stampin' Up! The wait is SO hard! I've had these little pouches made for a couple of weeks, so I thought I would photograph them and upload here just to share and keep me busy, LOL!
I was going to make a clipboard hair clip holder like I saw by Alecia Grimm in the Apr-May '05 issue of Paper Trends. Then, I got the idea of the little pouch. I've made bunches of these pouches, I got the directions from SU!'s Stampin' Success, June '06 issue, that demonstrator's get monthly. I'm still going to make the clipboard for Jayde and Jasmine though! Ü
The directions for the pouch say to use a 8 1/2 x 8 1/2 piece of cardstock, but I like to use double sided patterned paper. I made this one smaller using a piece of 4 x 4 double sided patterned paper. The pouch is made by folding, the only adhesive I use is on the front flap that's folded down.
You fold the piece of paper corner to corner to make a triangle and crease it with a bone folder. Fold the right point over to the middle of the left side, crease and fold the left point over to the middle of the right side and crease. Take one layer on top and fold it down, crease, add your adhesive under that and stick it down. I put punched flowers and buttons on the front. I used thin strips of paper and cardstock to thread the buttons and then I glued them on. The hair clips are made basically the same as the big clip/bookmarks, just don't put a flower on the back.
I think these would make cute little gifts for the girls in your life or as give aways for hostesses and/or guests, just use SU! punches for the hair clips instead of the Cuttlebug, dies and SU! doublesided paper of course Ü
Supplies: double sided paper from SU!, Basic Grey, Crafty Secrets and Making Memories. Hair clips from Wal-Mart, Cuttlebug and flower dies, chipboard coasters, buttons, ribbons, brads, 1/16" punch for the brads, tape adhesive and E6000.
I just noticed the date again, 07-07-07!
7 is my lucky number, wonder what kind of good luck I'm going to have today?? Ü
Labels:
3 - D items
Sunday, July 01, 2007
car cup holder coasters
I made these to go in Lanawho's Christmas box last year.
I thought I would share them here.
They are car cup holder coasters, I got these at a gift shop
but you can get them just about anywhere. They have a
picture on one side and plain on the other.
I love mine, my cup holders were always sticky and yucky until I started using them.
I used Stazon Timber brown to stamp the flowers & leaves from SU!'s Bud Basics set and the speckles from Itty Bitty Backgrounds. I stamped the flowers & leaves on a post-it note cut it out and made a mask, laid that over the flower on the coaster and stamped the speckle stamp on the coaster. I used Sharpie markers to color in the flowers & leaves.
I hope y'all had a happy new catty ordering day today, I still haven't narrowed down my list, ACK!!!!!!!!!!!!!!!!!!
Labels:
3 - D items,
Stampin Up
Subscribe to:
Posts (Atom)